In this blog post we are going to learn about Active-Active Azure VPN gateways. There are two methods to connect two virtual networks.
1. Azure VPN Gateways
2. Azure VNET Peering
Azure VNET Peering
Azure VNET peering allows connecting virtual networks seamlessly via Azure backbone infrastructure. This is similar to inter-VLAN routing in on-premises networks. The traffic will not pass via the public internet. It provides low latency, high bandwidth connectivity between virtual networks. VNET peering can use to connect virtual networks in the same Azure region or different Azure regions.
Azure VPN Gateways
If we are connecting virtual networks over the internet, we have to use VPN gateway option. This is the same for connecting Azure networks with on-premises networks. Also, if the encryption is a requirement, we have to use VPN gateways. Azure VPN Gateways can use to connect,
• Virtual Networks in the same region
• Virtual Networks in different regions
• Virtual Networks in different subscriptions
If the connection is over the public internet, it is not possible to guarantee the uptime as it depends on many facts. By using Active-Active Azure VPN gateways to improve the high availability of the VNet-to-VNet connections. This is important if you connecting the virtual network between different Azure regions. We also can use Active-Active Azure VPN gateways with cross-premises VPN connections.
In Active-Active Azure VPN gateway setup,
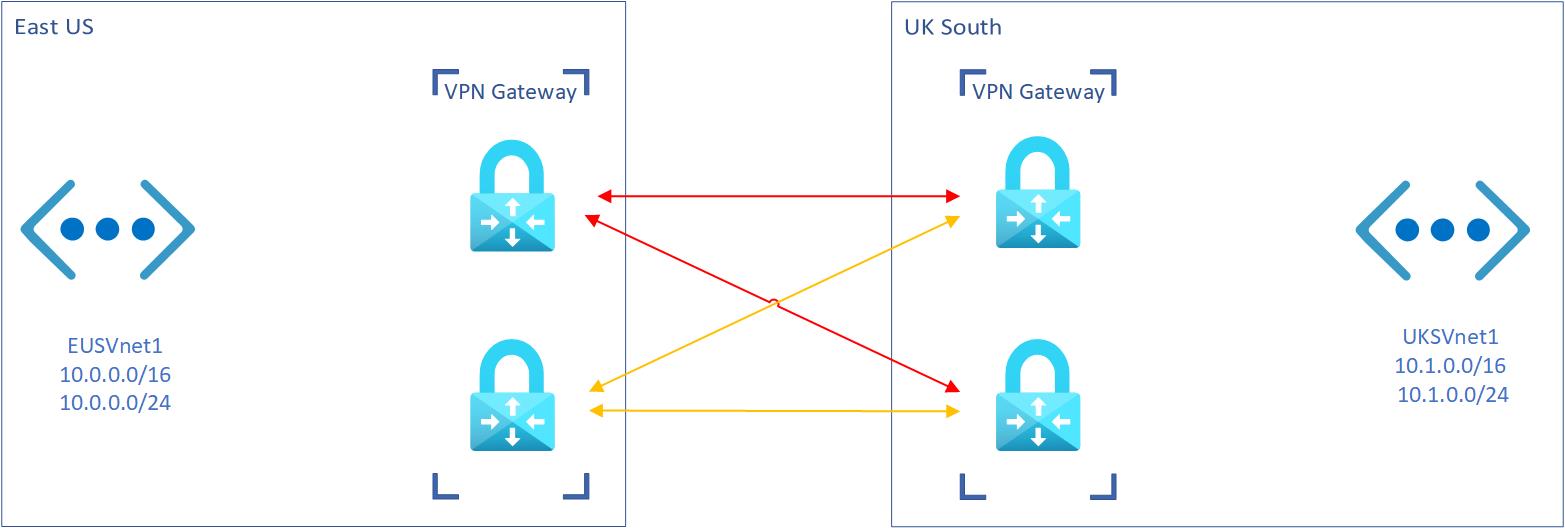
• There are two Gateway IP configurations with two public IP addresses for one VPN gateway. This allows initiating full-mesh connectivity between two virtual networks.
• VPN gateway SKU must be VpnGw1, VpnGw2, VpnGw3, or HighPerformance
• Supported to use BGP
In this demo, I am going to demonstrate how we can establish VNet-to-VNet connectivity between two Azure regions via Active-Active Azure VPN gateways.
In this demo setup, I got two virtual networks in East US and UK South region. As shown above, I am going to establish a fully mesh connectivity between two virtual networks.
For the configuration process, I will be using PowerShell. Therefore, please make sure you have an Azure PowerShell module installed. More info about it can find under https://docs.microsoft.com/en-us/powershell/azure/install-az-ps?view=azps-3.8.0
Create Active-Active Azure VPN Gateway in East US
Create a resource group in East US
The first step of the configuration is to create a new resource group in East US.
To do that,
1. Launch PowerShell console and connect to Azure using Connect-AzAccount
2. Create a new resource group using New-AzResourceGroup -Name REBELRG1 -Location “East US”. Here REBELRG1 is RG group name and East US is the location.
Create a virtual network
The next step is to create a new virtual network under REBELRG1 resource group.
$subn1 = New-AzVirtualNetworkSubnetConfig -Name VMNet1 -AddressPrefix 10.0.0.0/24
$gwsubn1 = New-AzVirtualNetworkSubnetConfig -Name “GatewaySubnet” -AddressPrefix 10.0.255.0/27
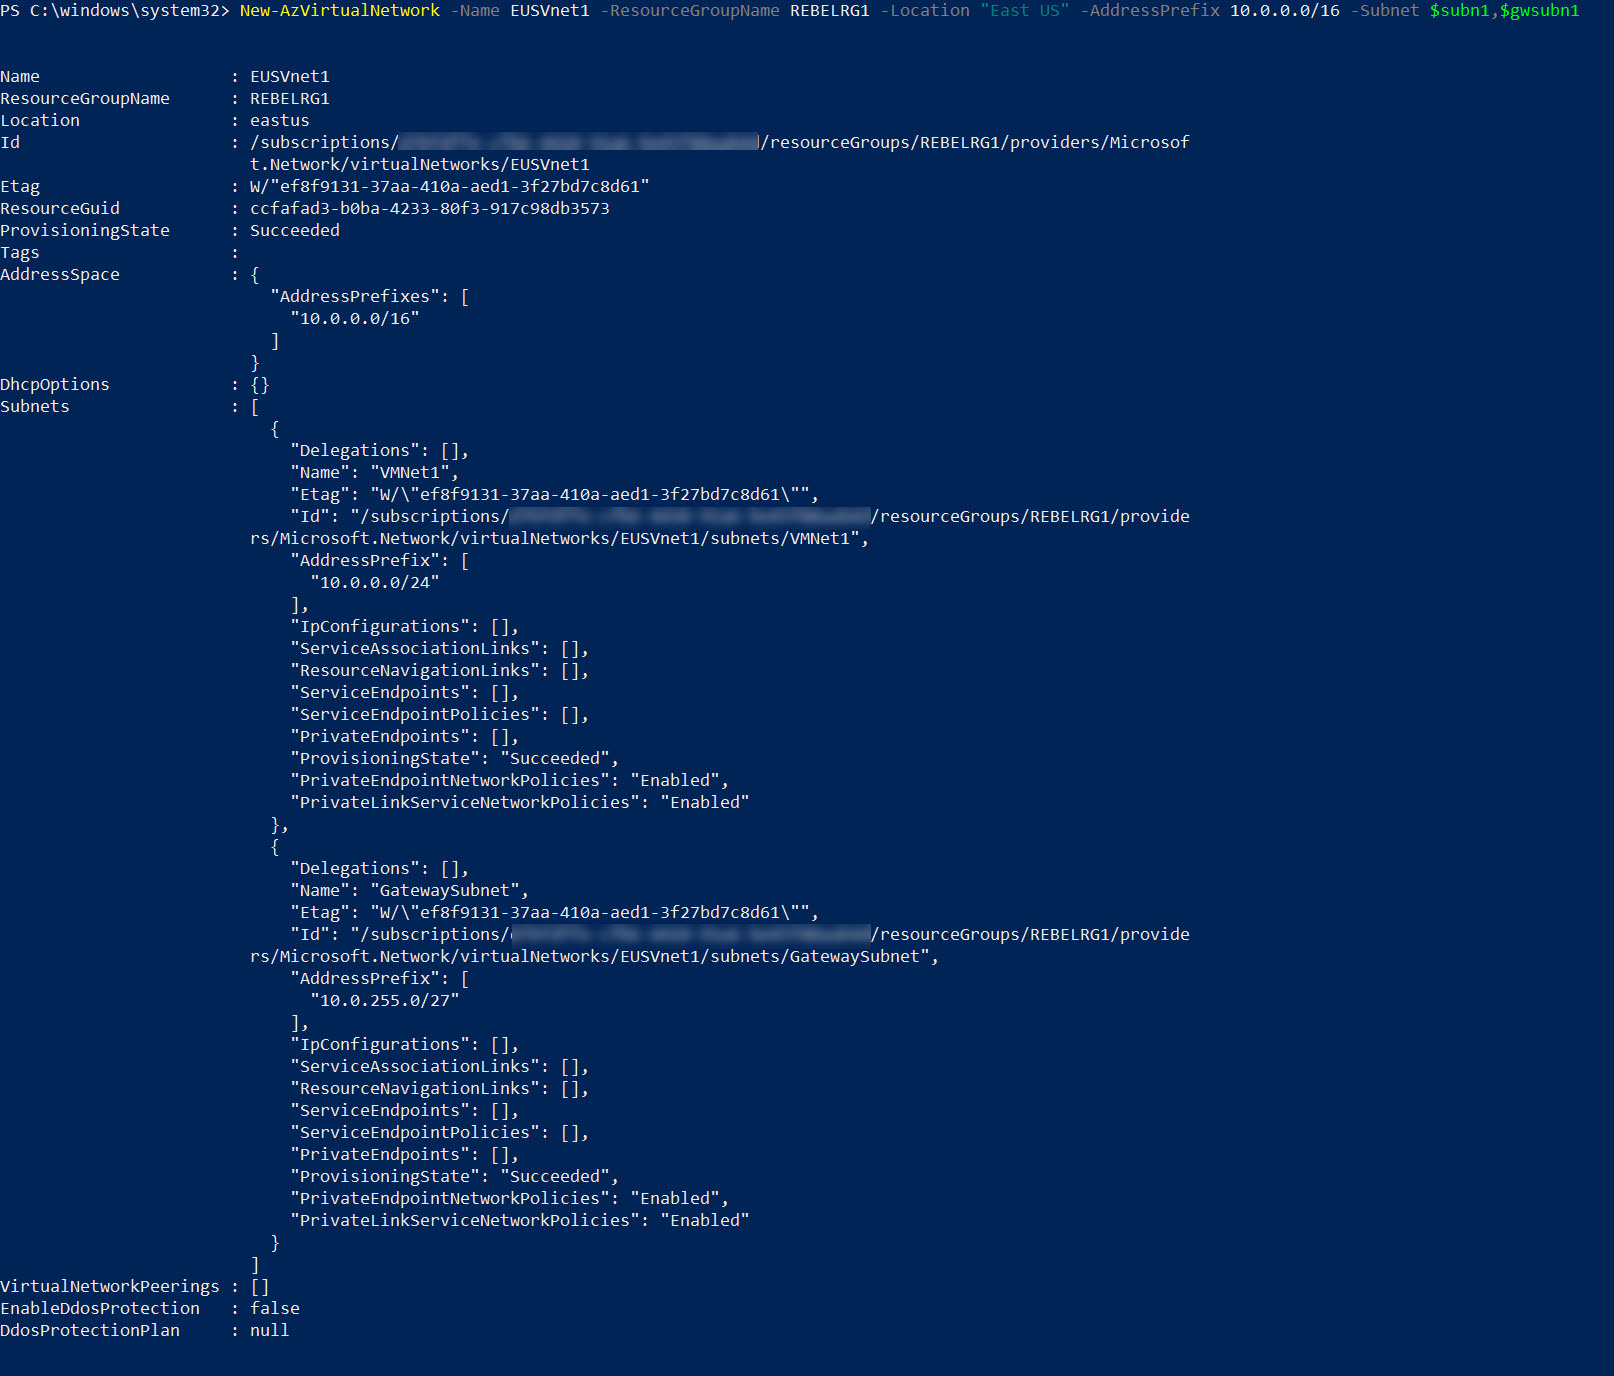
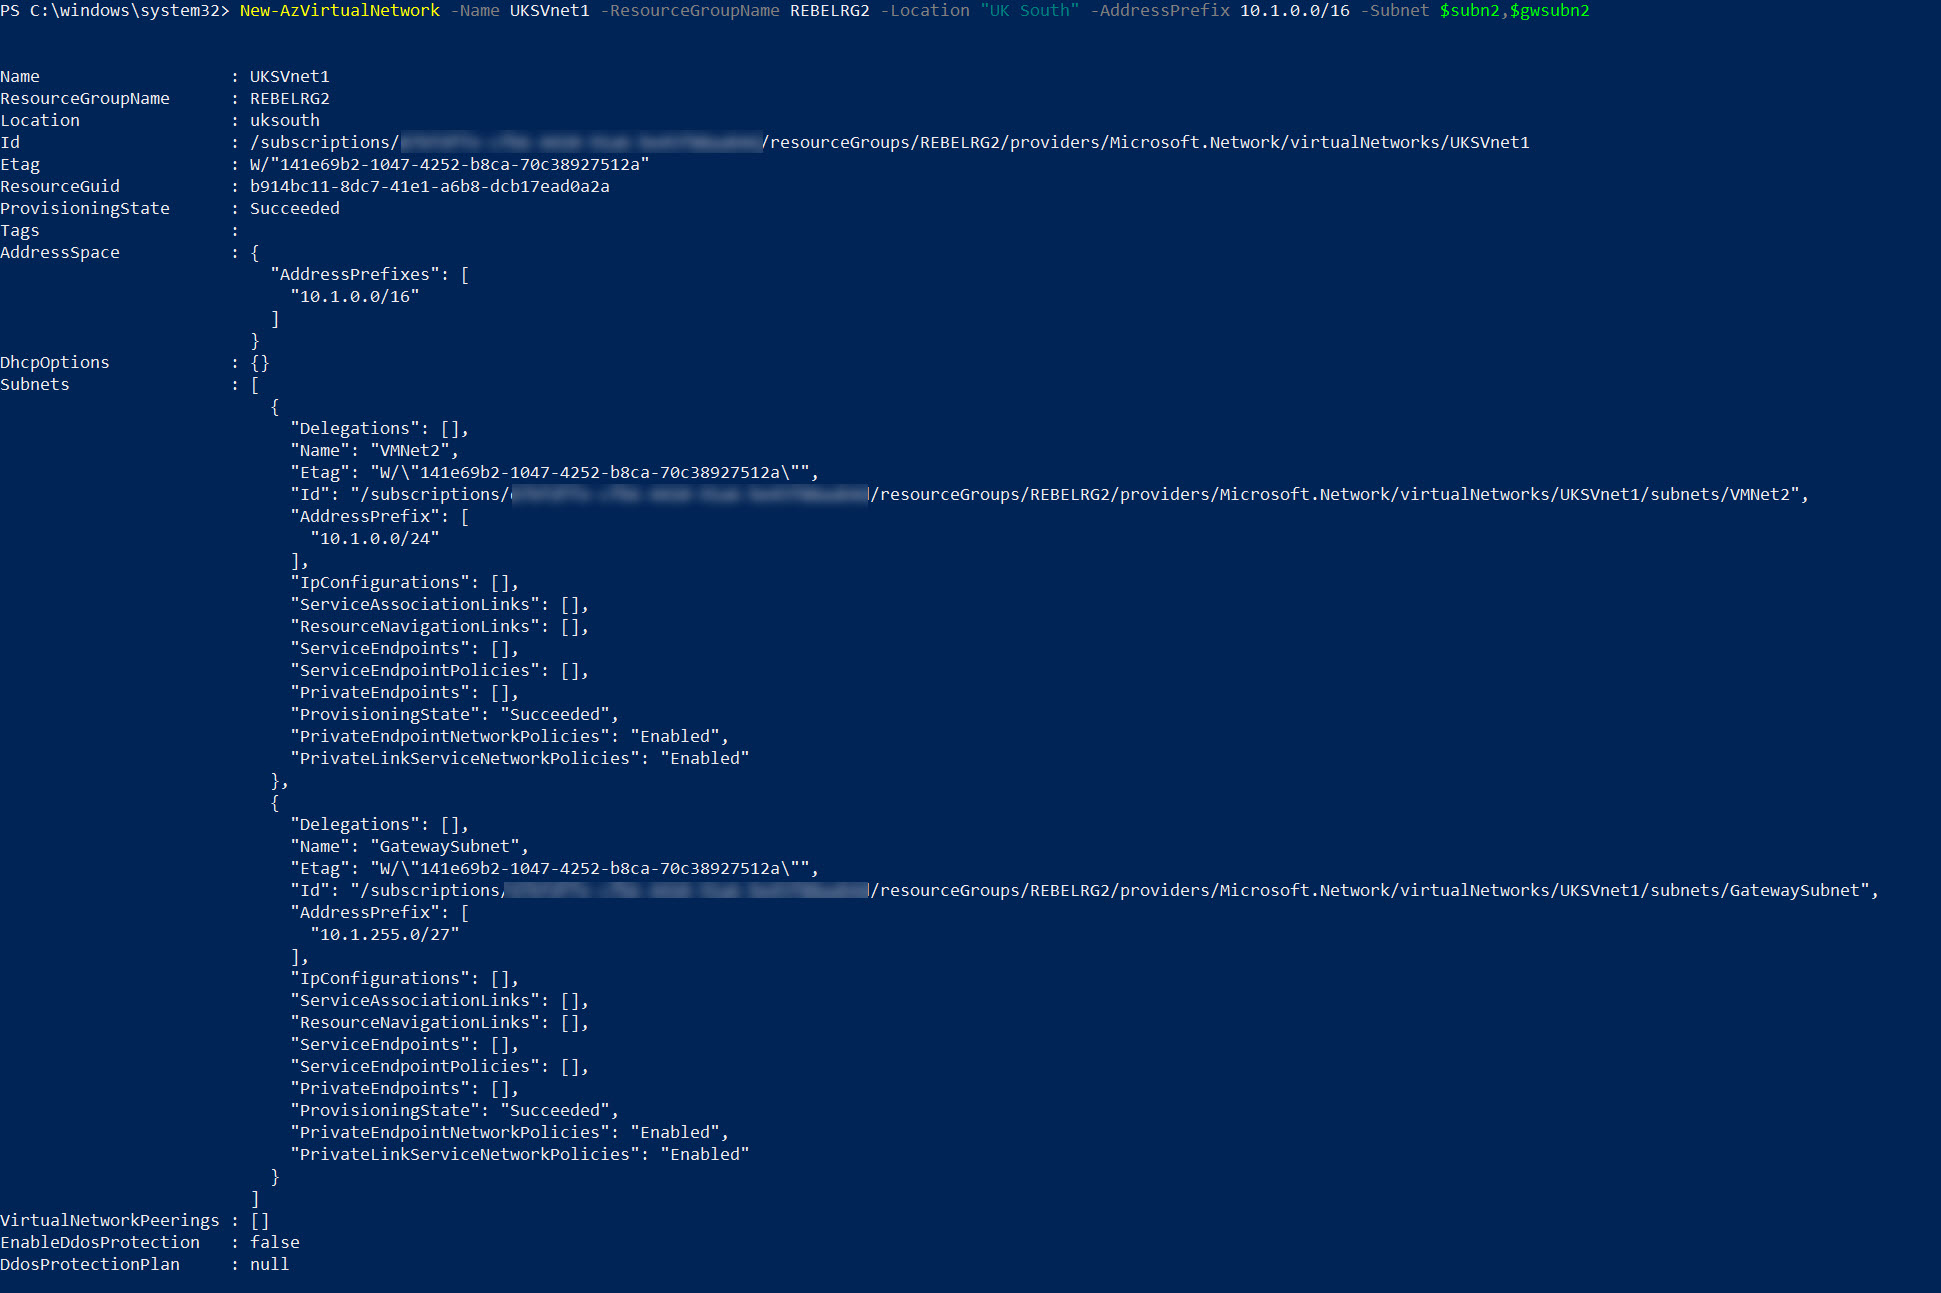
New-AzVirtualNetwork -Name EUSVnet1 -ResourceGroupName REBELRG1 -Location “East US” -AddressPrefix 10.0.0.0/16 -Subnet $subn1,$gwsubn1
EUSVnet1 address space is 10.0.0.0/16. It is a class B IP address range. We do not need the entire range for workloads. Therefore, I am going to create two small subnets under it.
• VM Network – 10.0.0.0/24
• Gateway subnet – 10.0.255.0/27
In the above, VM network is going to use for virtual machines and Gateway Subnet is going to use for the VPN gateway setup.
Virtual Network Gateway can only be created in a subnet with name ‘GatewaySubnet’
Create two public IP addresses
For active-active VPN gateway, we need two public ip addresses. Let’s go ahead and create it using,
$gatewayip1 = New-AzPublicIpAddress -Name EUSVnet1GW1 -ResourceGroupName REBELRG1 -Location “East US” -AllocationMethod Dynamic
$gatewayip2 = New-AzPublicIpAddress -Name EUSVnet1GW2 -ResourceGroupName REBELRG1 -Location “East US” -AllocationMethod Dynamic
In the above, EUSVnet1GW1 & EUSVnet1GW2 are the new two public ip addresses. VPN Gateway only supports Dynamic Public IP address allocation.
Create Azure VPN gateway IP configurations
Before we create the gateway, we need to create ip configuration.
$vnet1 = Get-AzVirtualNetwork -Name EUSVnet1 -ResourceGroupName REBELRG1
$gwsubnet1 = Get-AzVirtualNetworkSubnetConfig -Name “GatewaySubnet” -VirtualNetwork $vnet1
$eusgw1ipconf1 = New-AzVirtualNetworkGatewayIpConfig -Name eusgw1ipconf1 -Subnet $gwsubnet1 -PublicIpAddress $gatewayip1
$eusgw1ipconf2 = New-AzVirtualNetworkGatewayIpConfig -Name eusgw1ipconf2 -Subnet $gwsubnet1 -PublicIpAddress $gatewayip2
In above, New-AzVirtualNetworkGatewayIpConfig command used to create an IP configuration for gateway (using previously created gateway subnet & public IP addresses)
Create active-active VPN Gateway
Finally, we can create the gateway using,
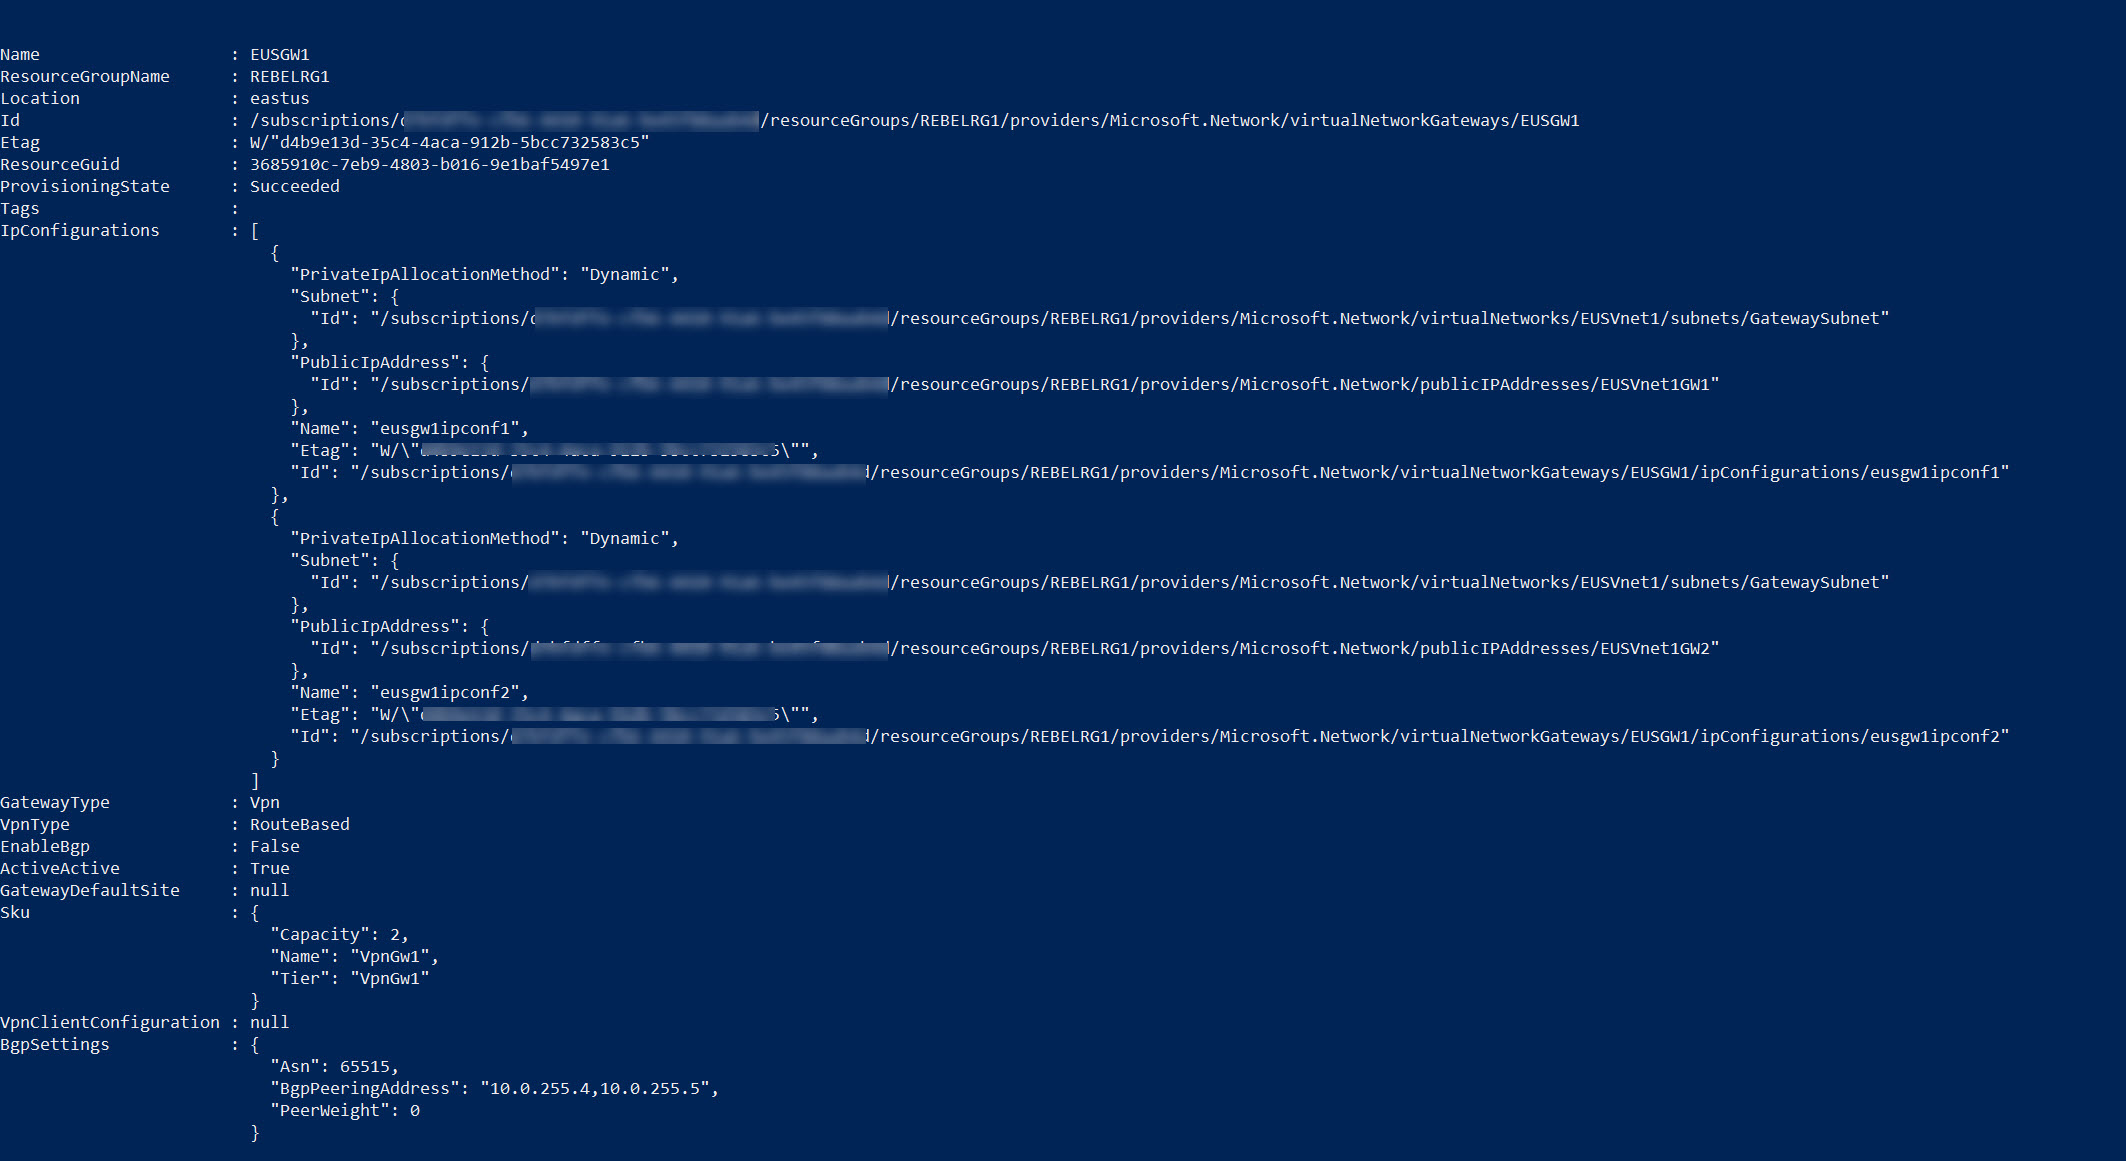
New-AzVirtualNetworkGateway -Name EUSGW1 -ResourceGroupName REBELRG1 -Location “East US” -IpConfigurations $eusgw1ipconf1,$eusgw1ipconf2 -GatewayType Vpn -VpnType RouteBased -GatewaySku VpnGw1 -EnableActiveActiveFeature -Debug
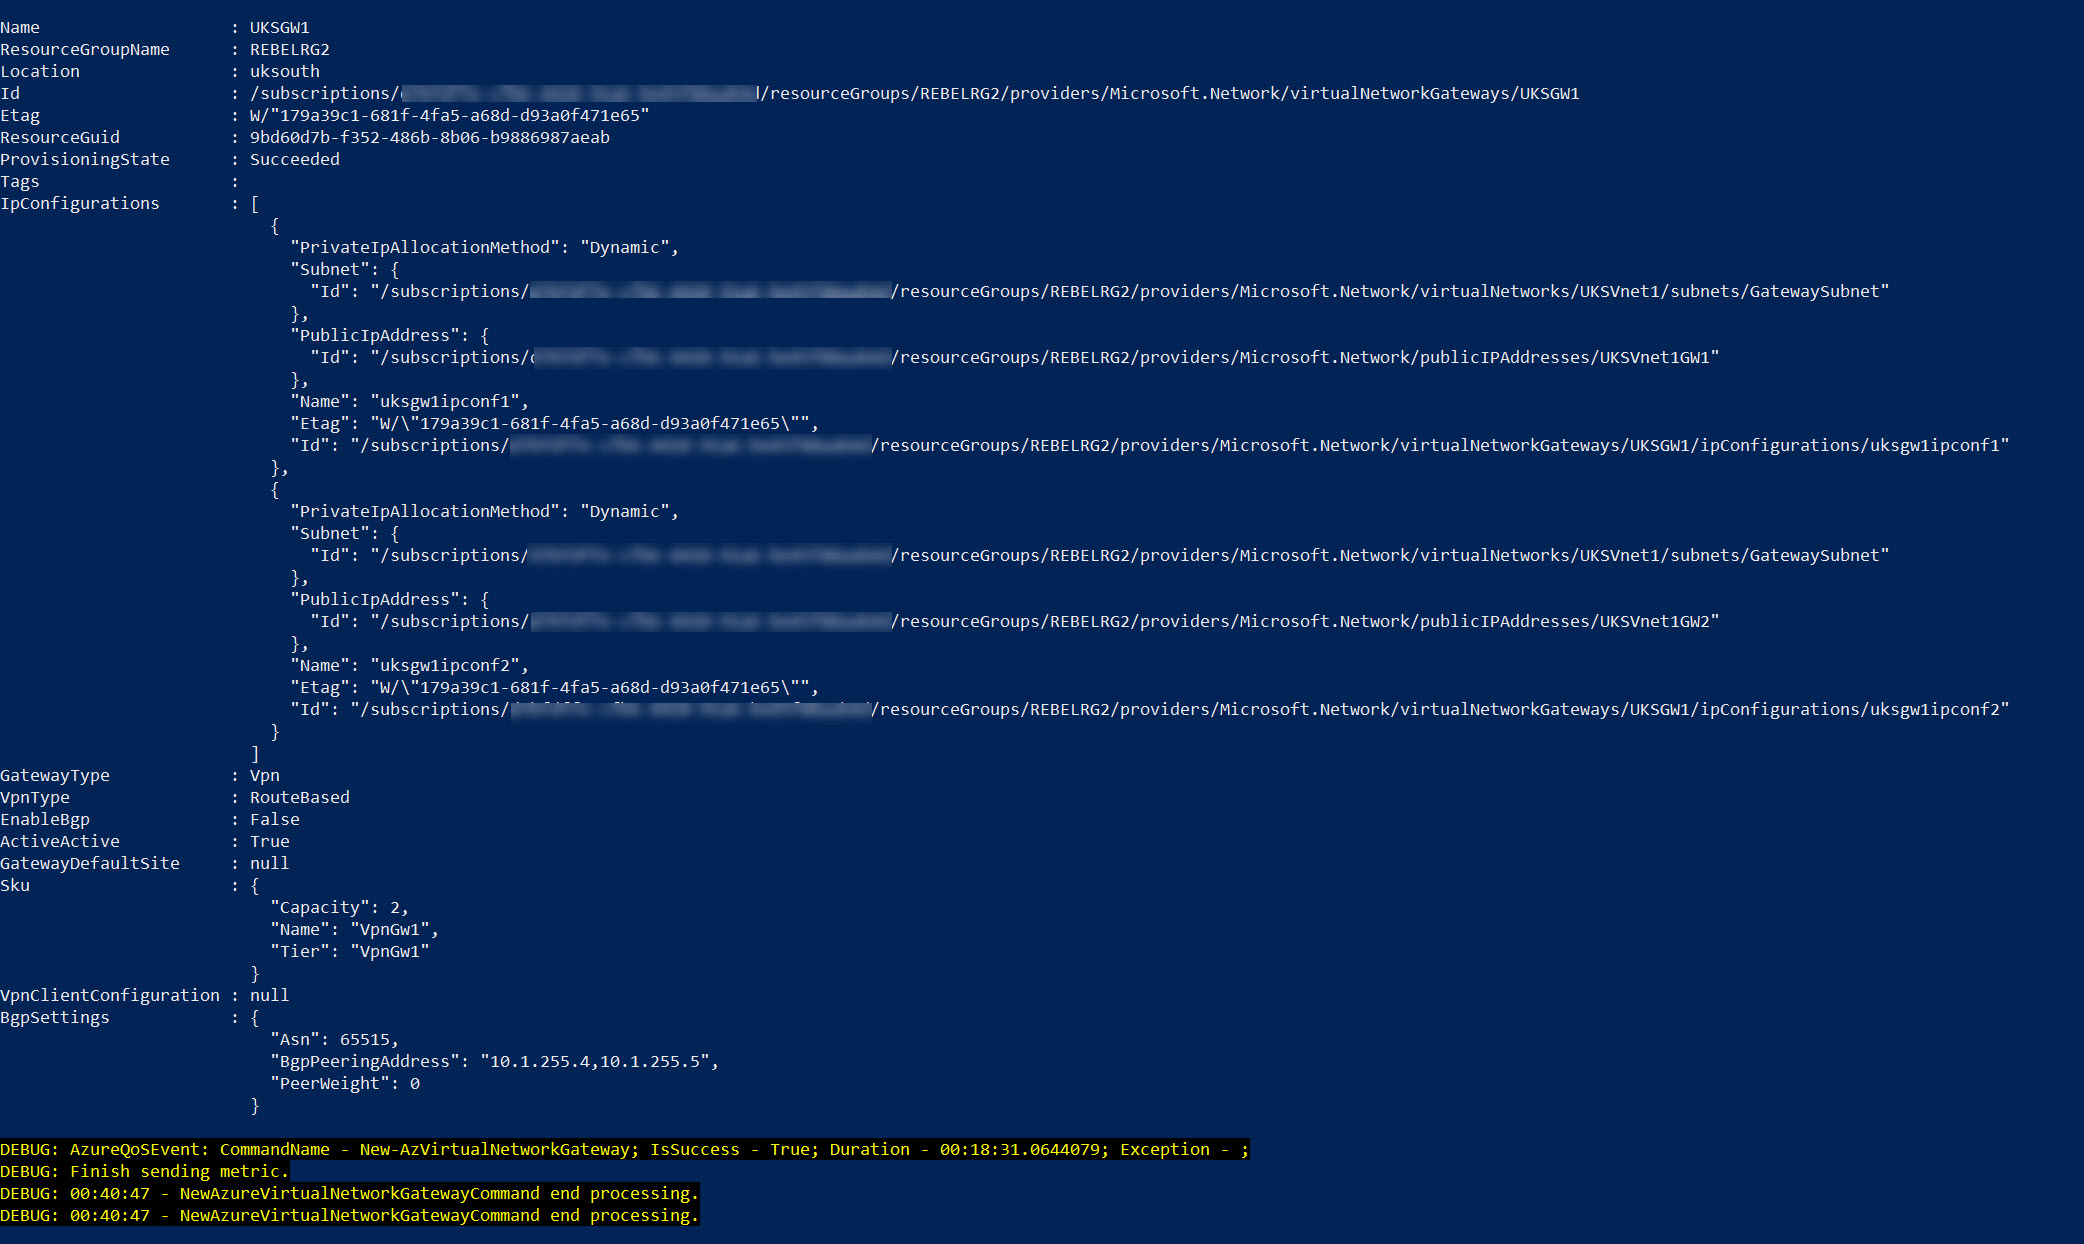
In the above, my new VPN gateway is called EUSGW1. I have enabled active-active mode using -EnableActiveActiveFeature. The gateway SKU is set to VpnGw1.
It can take around 45 minutes to complete VPN gateway setup.
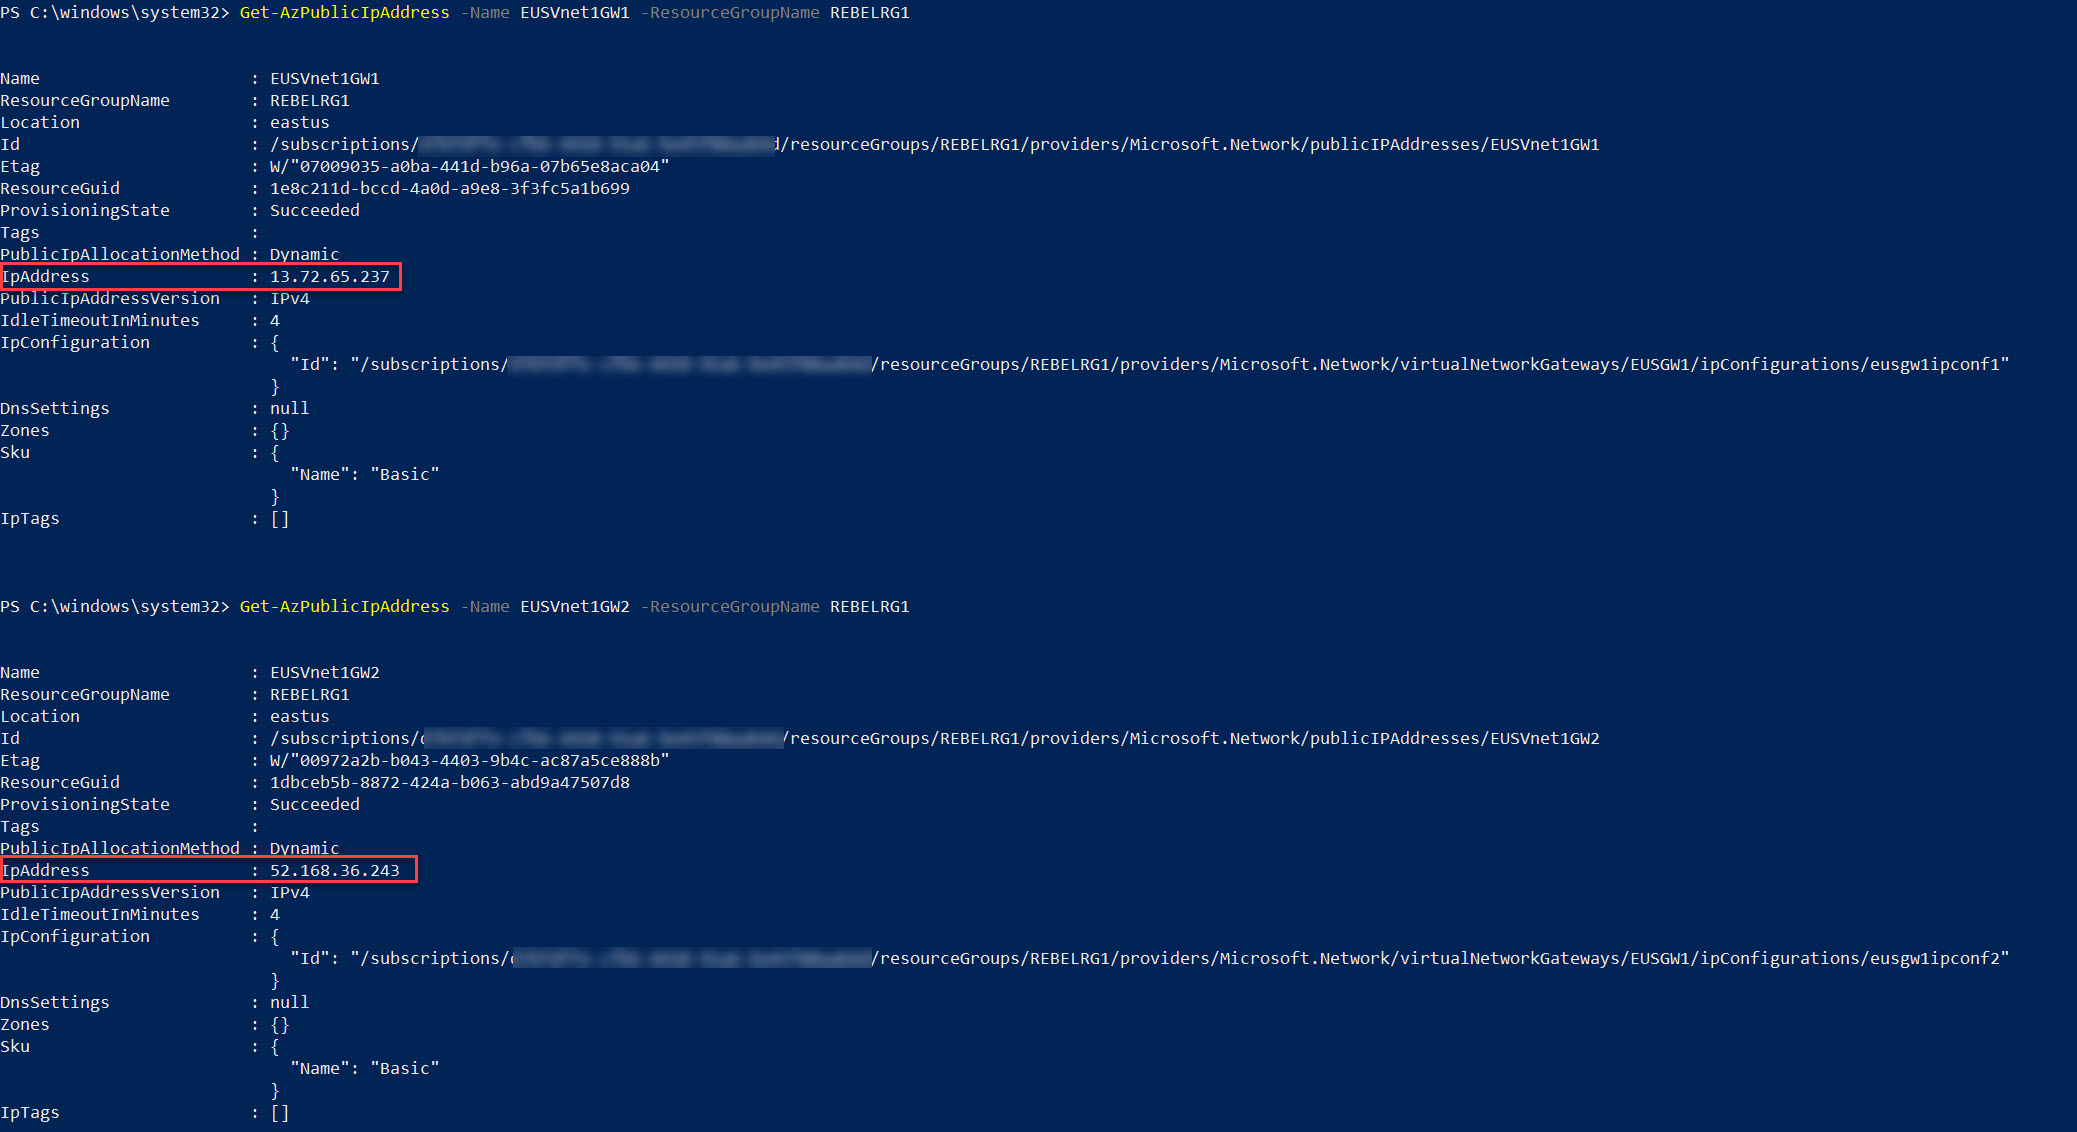
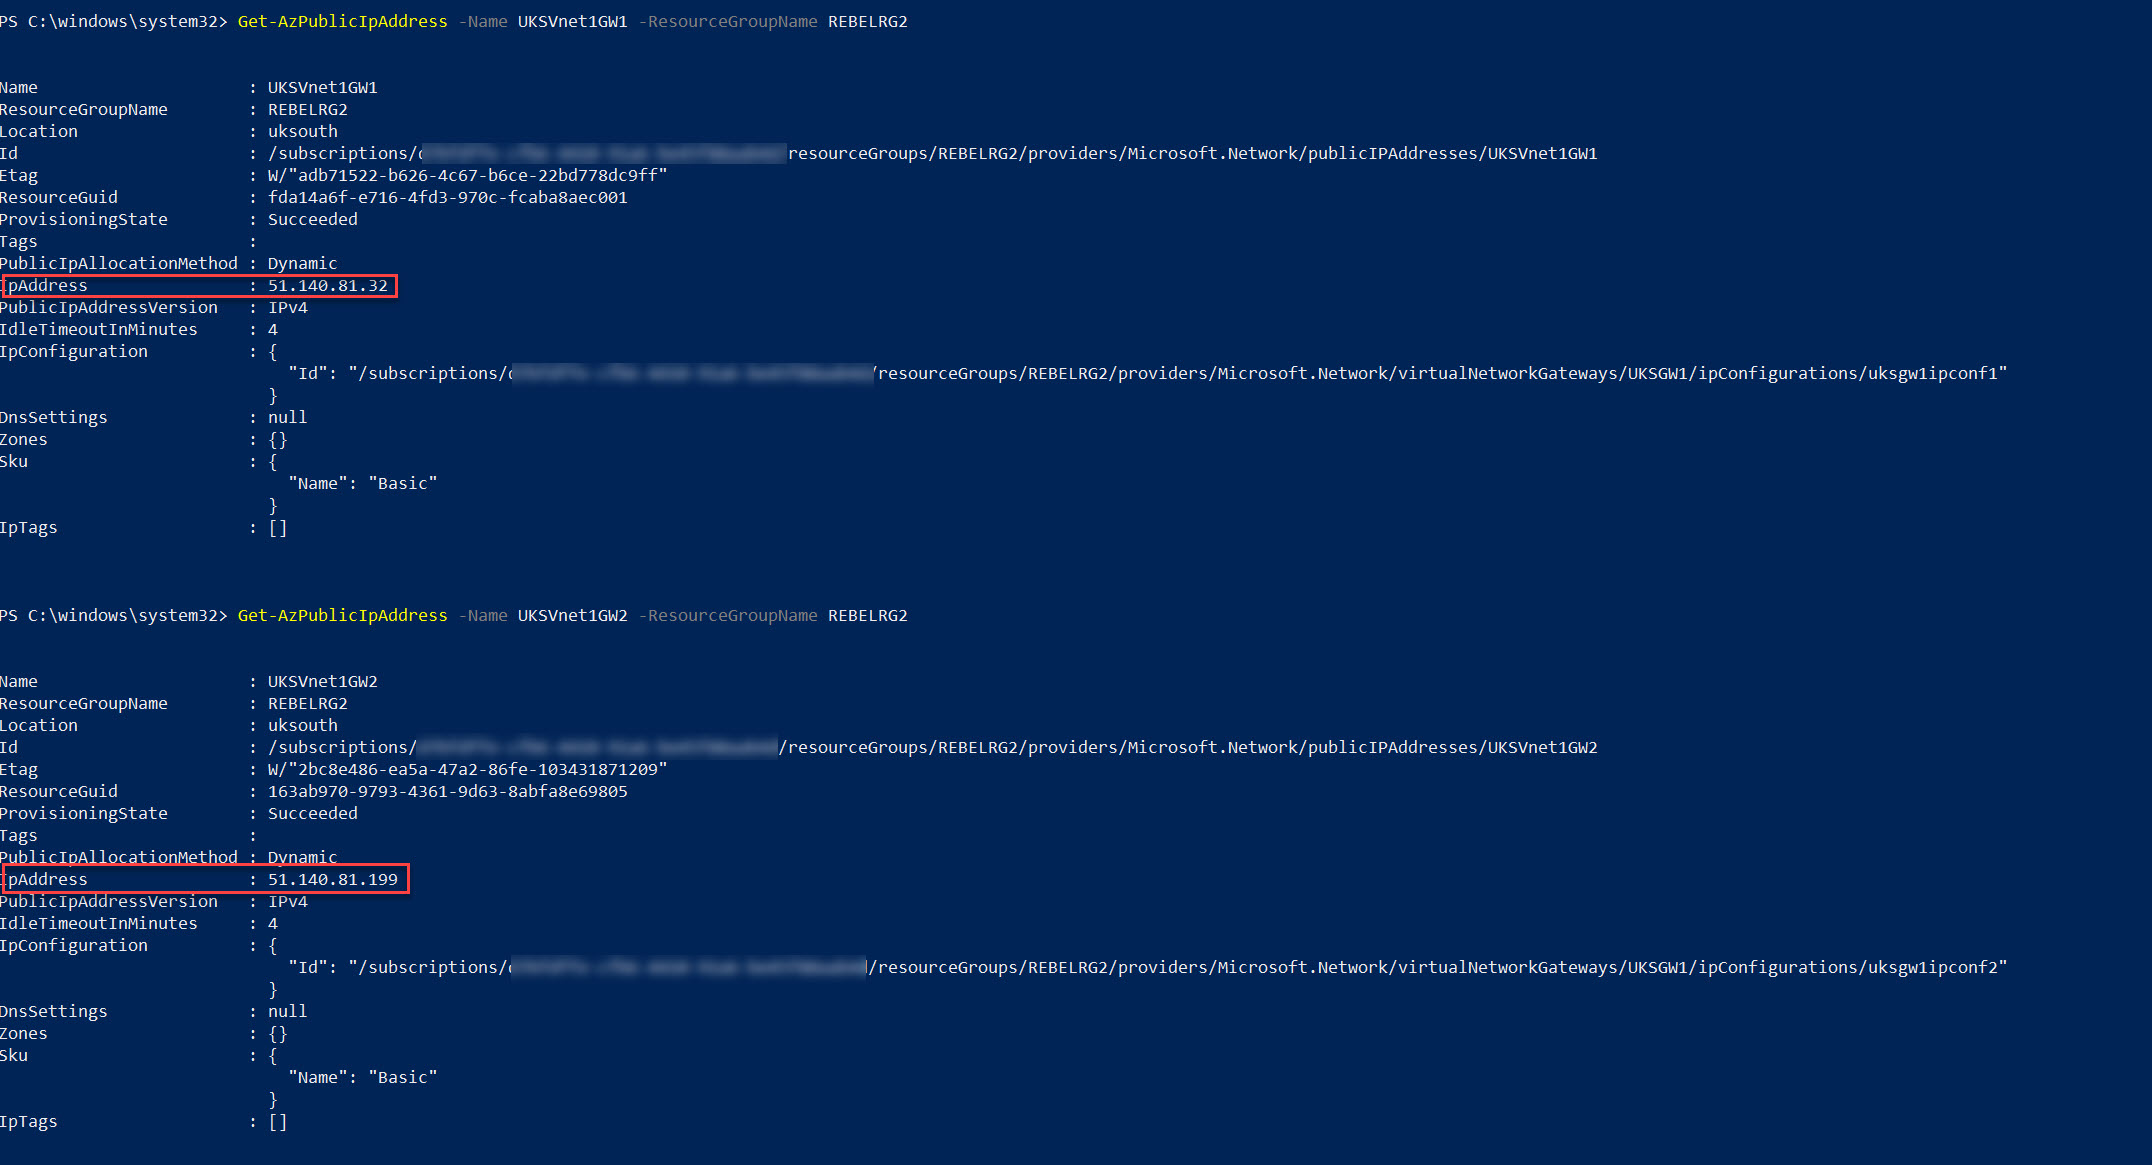
According to configuration, we should see two public IP addresses associated with Azure VPN gateway. We can verify it using,
Get-AzPublicIpAddress -Name EUSVnet1GW1 -ResourceGroupName REBELRG1
Get-AzPublicIpAddress -Name EUSVnet1GW2 -ResourceGroupName REBELRG1
This completes the setup of active-active Azure VPN gateway in East US region.
Create Active-Active Azure VPN Gateway in UK South
Create a resource group in UK South
Let’s go ahead and create a new resource group in UK South region.
New-AzResourceGroup -Name REBELRG2 -Location “UK South”
In the above, REBELRG2 is the resource group names and it is created in UK South region.
Create a virtual network
The next step of the configuration is to create the new virtual network UKSVnet1. This VNet contains two subnets.
• VM Network – 10.1.0.0/24
• Gateway subnet – 10.1.255.0/27
In the above, VM network is going to use for virtual machines and Gateway Subnet is going to use for the VPN gateway setup.
Create two public IP addresses
Now we need to create two public IP addresses for the gateway.
$gatewayip3 = New-AzPublicIpAddress -Name UKSVnet1GW1 -ResourceGroupName REBELRG2 -Location “UK South” -AllocationMethod Dynamic
$gatewayip4 = New-AzPublicIpAddress -Name UKSVnet1GW2 -ResourceGroupName REBELRG2 -Location “UK South” -AllocationMethod Dynamic
In the above, UKSVnet1GW1 & UKSVnet1GW2 are the new two public ip addresses. VPN Gateway only supports Dynamic Public IP address allocation.
Create Azure VPN gateway IP configurations
As we did before, we also need to create ip configuration.
$vnet2 = Get-AzVirtualNetwork -Name UKSVnet1 -ResourceGroupName REBELRG2
$gwsubnet2 = Get-AzVirtualNetworkSubnetConfig -Name “GatewaySubnet” -VirtualNetwork $vnet2
$uksgw1ipconf1 = New-AzVirtualNetworkGatewayIpConfig -Name uksgw1ipconf1 -Subnet $gwsubnet2 -PublicIpAddress $gatewayip3
$uksgw1ipconf2 = New-AzVirtualNetworkGatewayIpConfig -Name uksgw1ipconf2 -Subnet $gwsubnet2 -PublicIpAddress $gatewayip4
In above, New-AzVirtualNetworkGatewayIpConfig command used to create an IP configuration for gateway (using previously created gateway subnet & public IP addresses)
Create active-active VPN Gateway
We can create VPN gateway by using,
New-AzVirtualNetworkGateway -Name UKSGW1 -ResourceGroupName REBELRG2 -Location “UK South” -IpConfigurations $uksgw1ipconf1,$uksgw1ipconf2 -GatewayType Vpn -VpnType RouteBased -GatewaySku VpnGw1 -EnableActiveActiveFeature -Debug
In the above, the new VPN gateway is called UKSGW1. I also enabled active-active mode using -EnableActiveActiveFeature. The gateway SKU is set to VpnGw1.
Once gateway setup is completed, let’s go ahead and verify the two gateway IP addresses using,
Get-AzPublicIpAddress -Name UKSVnet1GW1 -ResourceGroupName REBELRG2
Get-AzPublicIpAddress -Name UKSVnet1GW2 -ResourceGroupName REBELRG2
Establish connectivity between East US and UK South Gateways
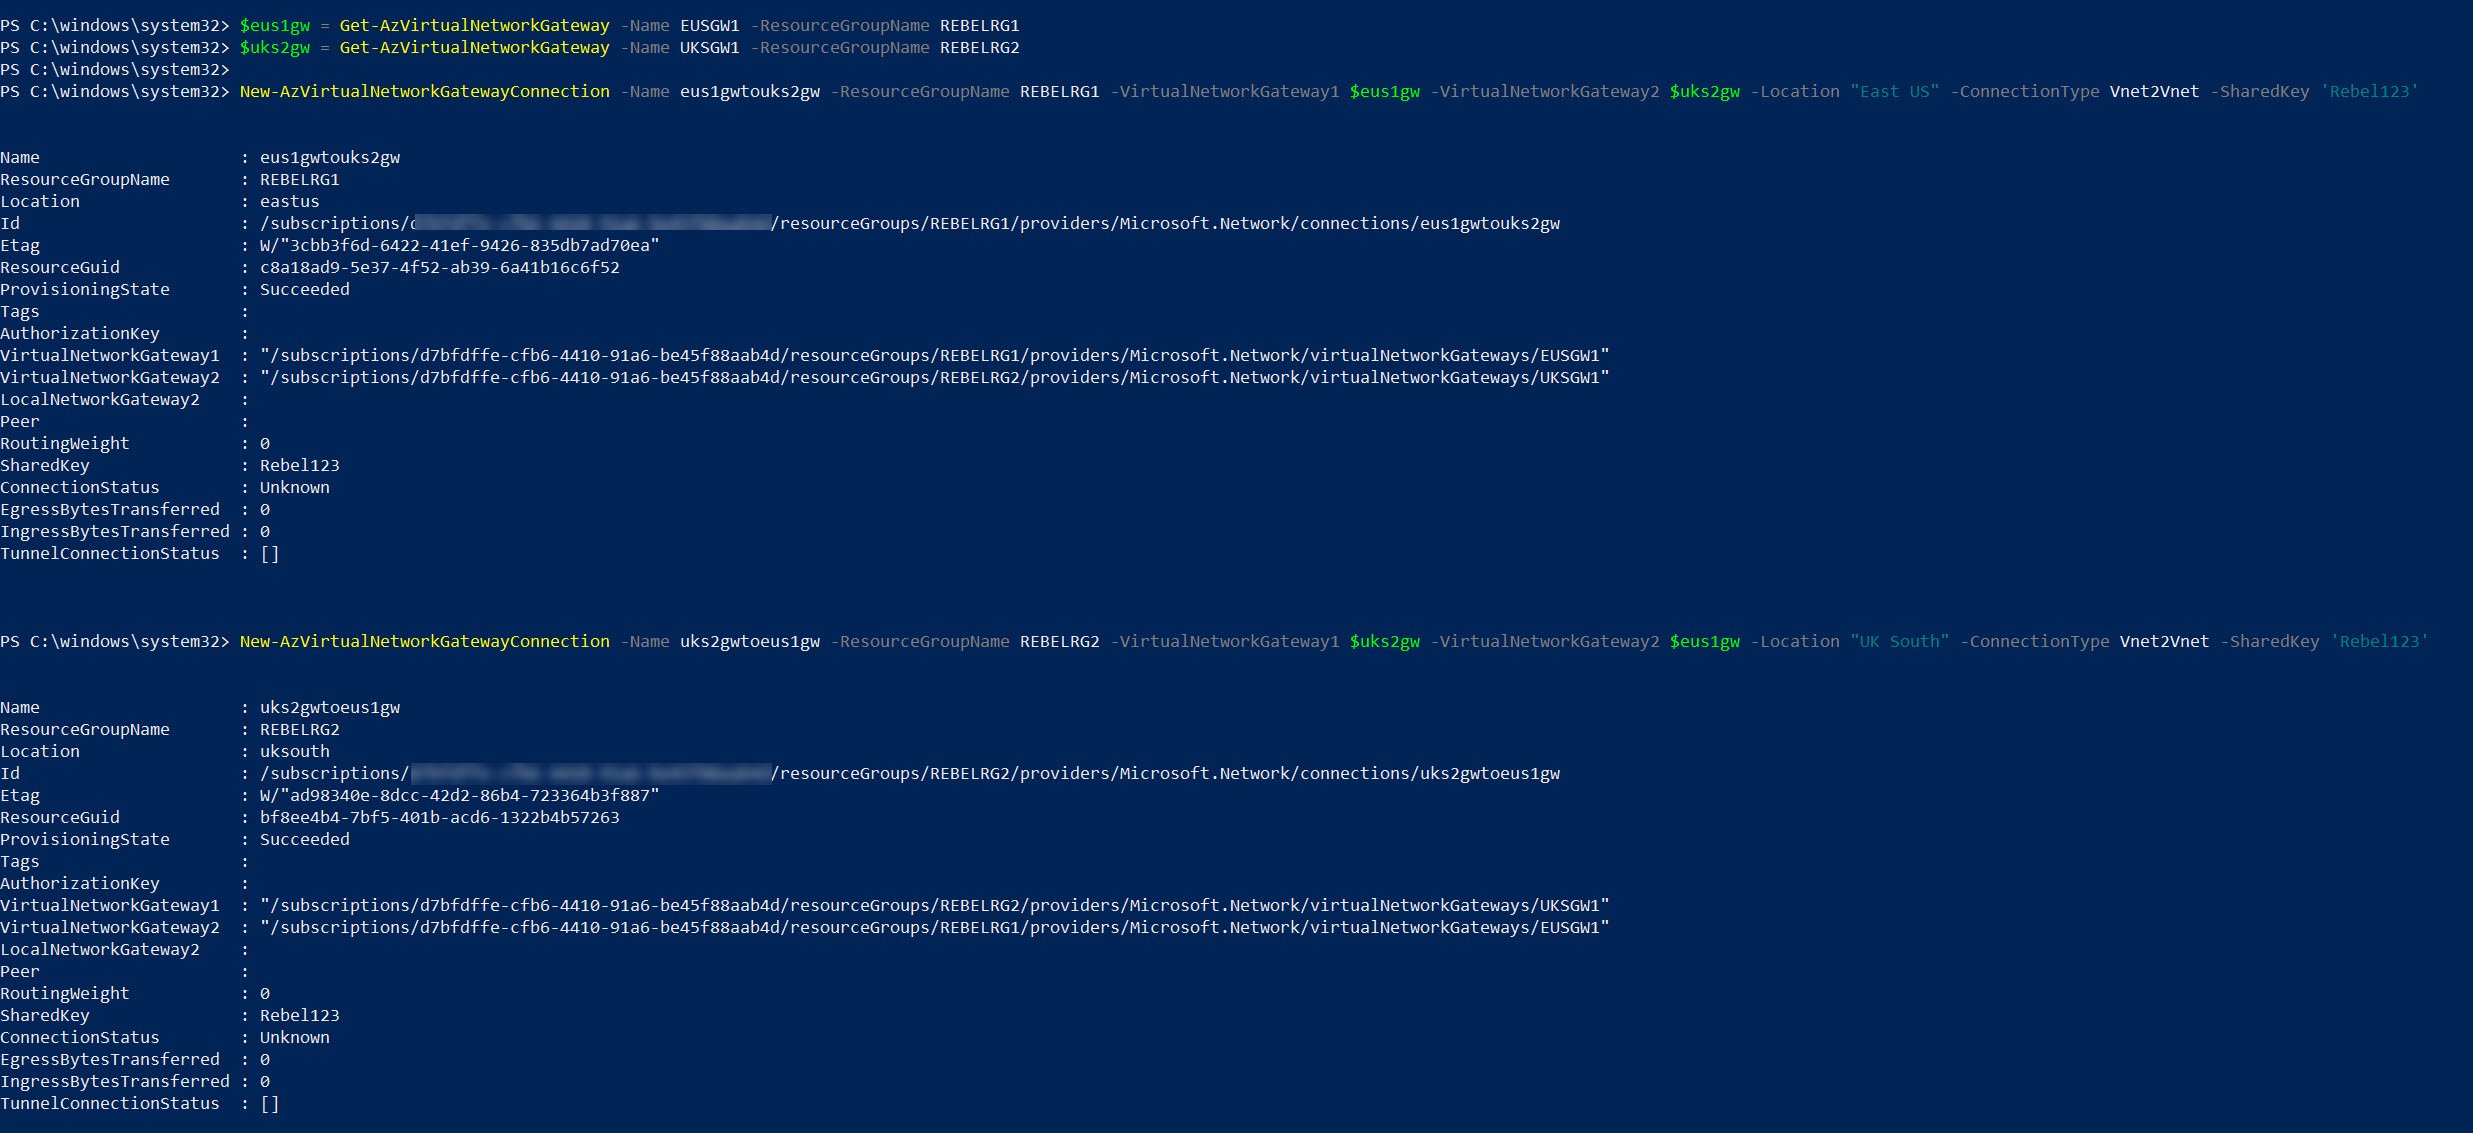
Now we have fully working active-active gateways. The next step is to initiate connectivity between those. We can do it by using,
$eus1gw = Get-AzVirtualNetworkGateway -Name EUSGW1 -ResourceGroupName REBELRG1
$uks2gw = Get-AzVirtualNetworkGateway -Name UKSGW1 -ResourceGroupName REBELRG2
New-AzVirtualNetworkGatewayConnection -Name eus1gwtouks2gw -ResourceGroupName REBELRG1 -VirtualNetworkGateway1 $eus1gw -VirtualNetworkGateway2 $uks2gw -Location “East US” -ConnectionType Vnet2Vnet -SharedKey ‘Rebel123’
New-AzVirtualNetworkGatewayConnection -Name uks2gwtoeus1gw -ResourceGroupName REBELRG2 -VirtualNetworkGateway1 $uks2gw -VirtualNetworkGateway2 $eus1gw -Location “UK South” -ConnectionType Vnet2Vnet -SharedKey ‘Rebel123’
In the above, I am using the Vnet2Vnet connection type. I am also using pre-shared key ‘Rebel123’ to establish the connection. This can be changed to a value you required.
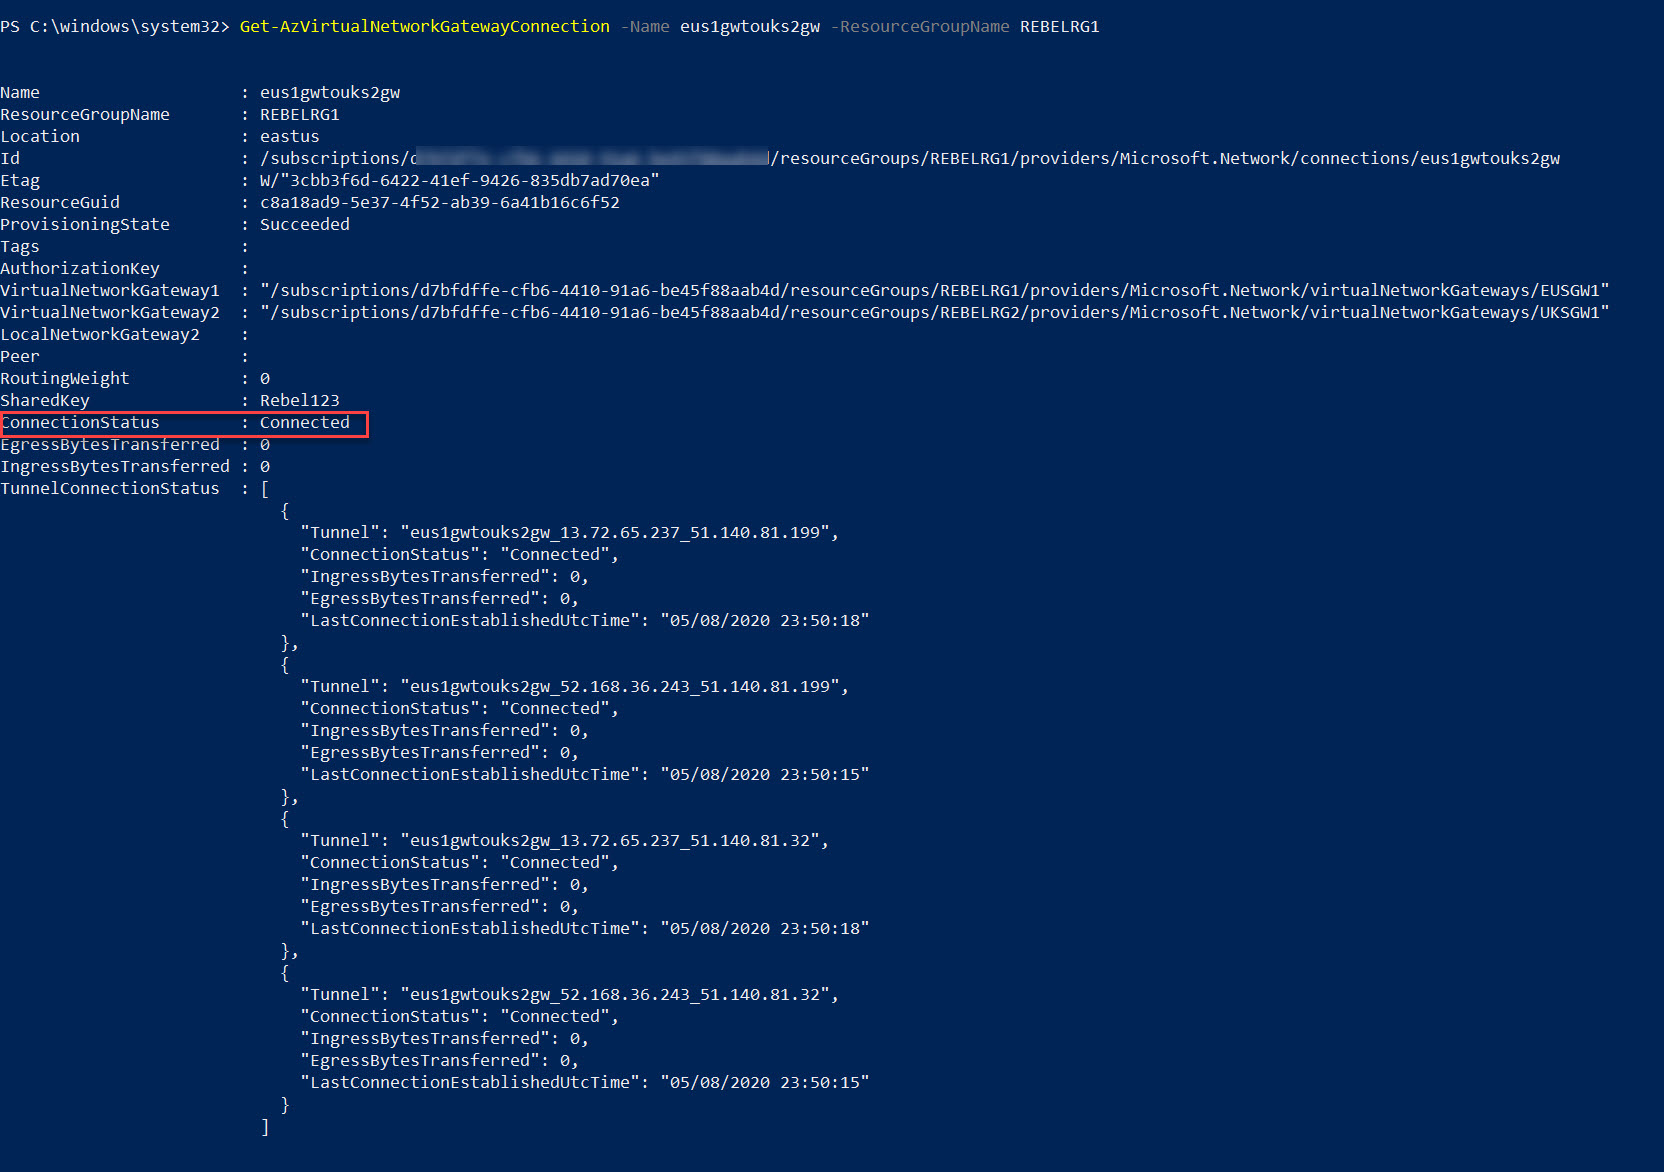
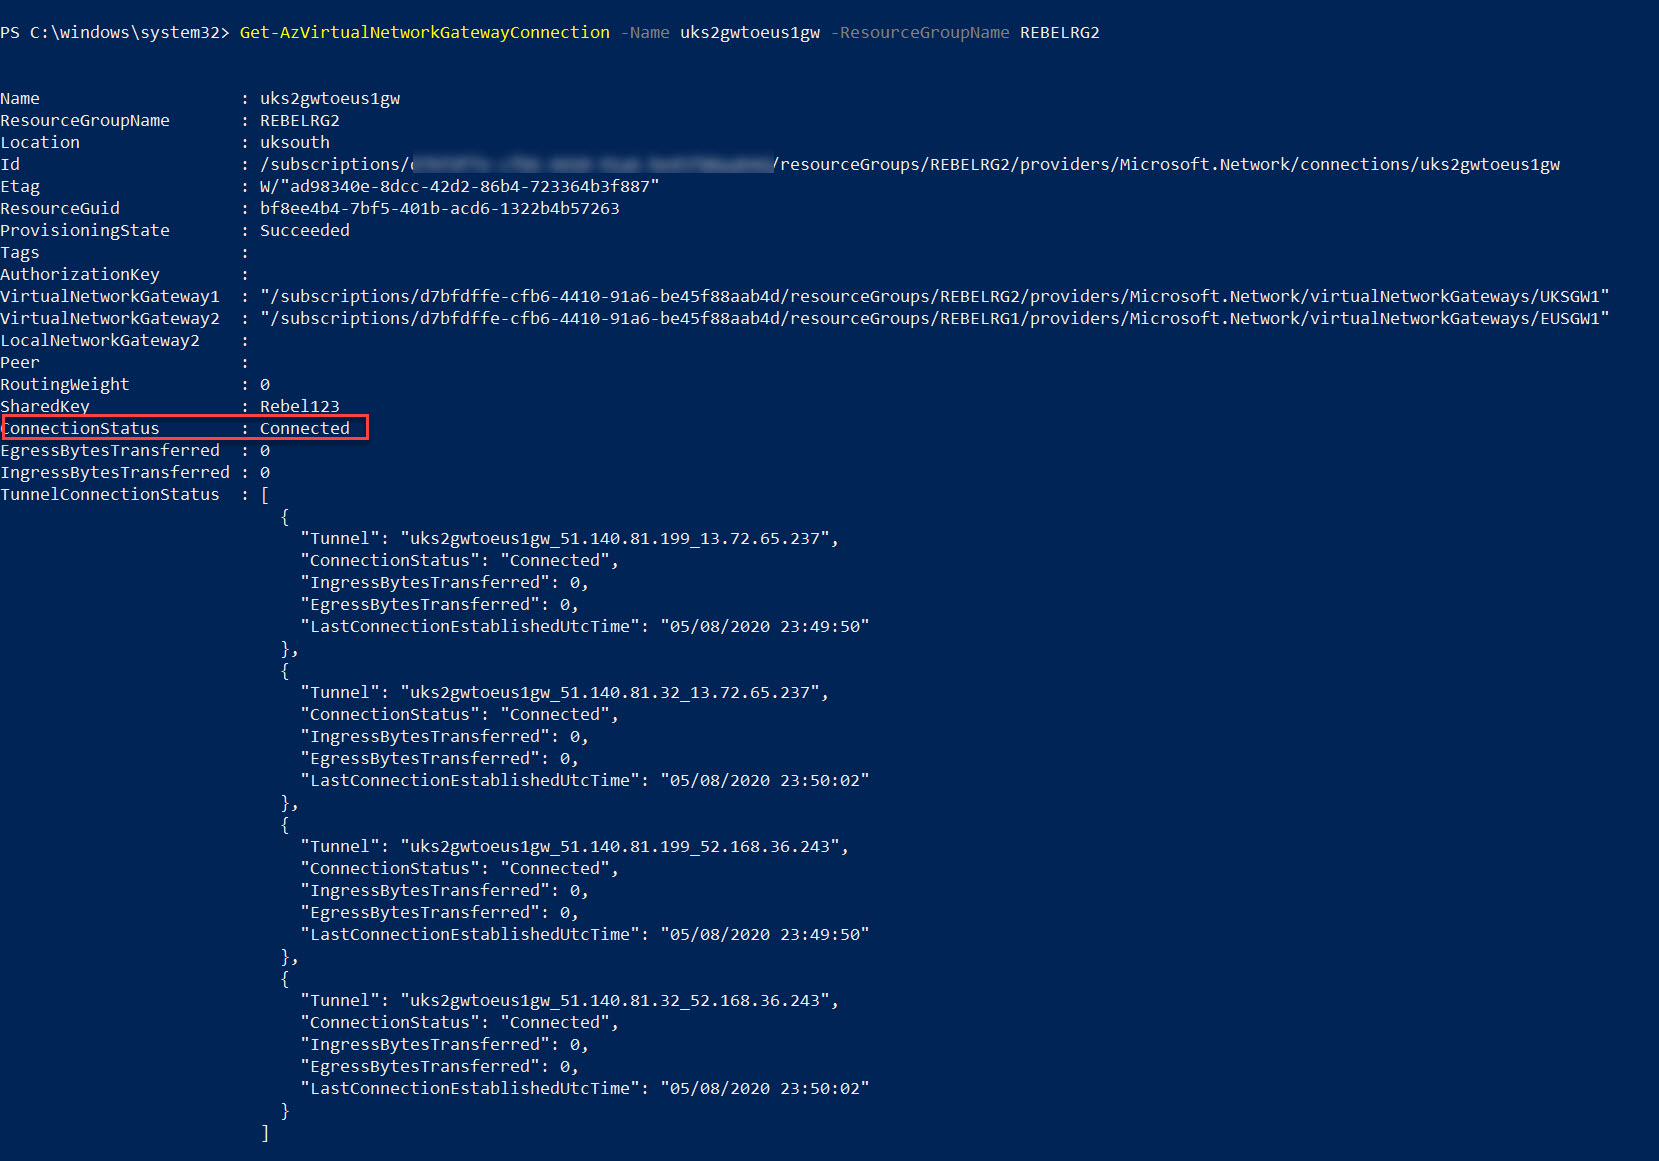
This establishes full-mesh connection between two VPN gateways. Let’s go ahead and verify the connection.
To verify the connection from EUSVnet1 to UKSVnet1, we can use the following command,
Get-AzVirtualNetworkGatewayConnection -Name eus1gwtouks2gw -ResourceGroupName REBELRG1
To verify the connection from UKSVnet1 to EUSVnet1 we can use,
Get-AzVirtualNetworkGatewayConnection -Name uks2gwtoeus1gw -ResourceGroupName REBELRG2
As we can see the connections are established successfully.
Testing
We can further verify this by using the following test.
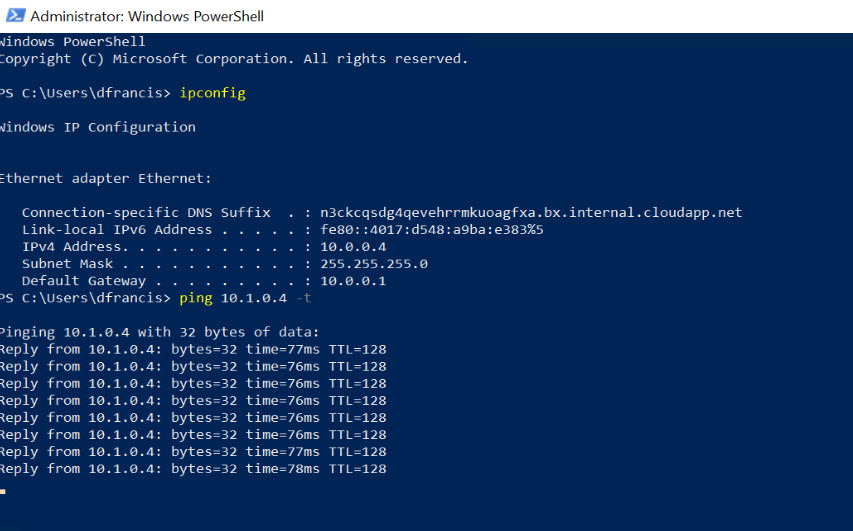
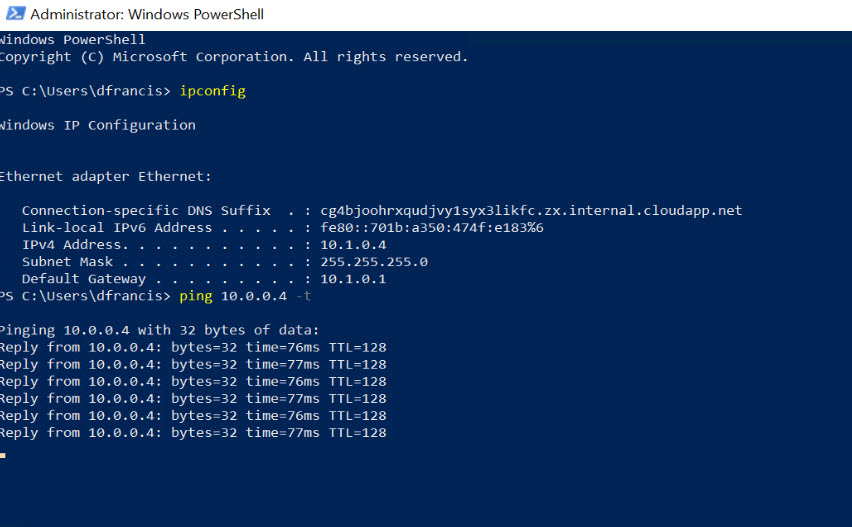
I have a VM called REBELTVM01 in East US region. It is using EUSVnet1 virtual network and has private ip address 10.0.0.4 allocated.
I also have a VM called REBELTVM02 in UK South region. It is using UKSVnet1 virtual network and has private ip address 10.1.0.4 allocated.
If the connectivity works, I should be able to ping between these two servers by using private ip addresses.
From REBELTVM01 to REBELTVM02
From REBELTVM02 to REBELTVM01
As we can see, the connectivity between two virtual networks is working as expected. I hope now you have a better understanding of how to setup active-active VPN gateway between two VNets. This marks the end of this blog post. If you have any further questions feel free to contact me on rebeladm@live.com also follow me on twitter @rebeladm to get updates about new blog posts.

