Some time ago I wrote an article about sign-in risk-based conditional access policies. But things have been changed over time and I thought it is time to update it with new content.
Let’s assume we have a web application that is published via the internet. To access the services, the user has to provide a user name and password. If one of the users’ accounts compromised, how the system can differentiate legitimate access and illegal access? From the system’s point of view, as long as someone provides a valid user name and password system will allow access. But if we can analyze user access behaviour and detect anomalies, potentially we will be able to detect illegal access attempts. As an example, let’s assume the user is always log in from Canada. The user logged in to the system at 10 am successful. By 11 am the system detects another authentication attempt from UK for the same user. As we can see this behaviour is suspicious and if the system can detect this automatically, we can prevent a possible illegal access attempt.
Sign-in risk-based Azure conditional access policies help organizations to review user sign-in behaviours and detect risks. Then, based on risk levels, organizations can either block the user or enforce actions such as multi-factor authentication to prove their identity.
Azure categorizes sign-in risks into four levels.
- High
- Medium
- Low
- No risk
We can use one or more sign-in risk levels with a conditional access policy.
Due to security reasons, Microsoft does not provide exact details about how the risk levels are calculated. However, Microsoft says the following events contribute on risk level calculation.
| Risk Detection Type | Description | Detection Type |
| Anonymous IP address | This risk detection type indicates sign-ins from an anonymous IP address (for example, Tor browser or anonymous VPN) | Realtime |
| Atypical travel | This risk detection type identifies two sign-ins originating from geographically distant locations, where at least one of the locations may also be atypical for the user, given past behaviour. | Offline |
| Malware linked IP address | This risk detection type indicates sign-ins from IP addresses infected with malware that is known to actively communicate with a bot server. | Offline |
| Unfamiliar sign-in properties | This risk detection type considers past sign-in history (IP, Latitude / Longitude and ASN) to look for anomalous sign-ins. | Realtime |
| Password spray | A password spray attack is where multiple usernames are attacked using common passwords in a unified brute force manner to gain unauthorized access. This risk detection is triggered when a password spray attack has been performed. | Offline |
| Admin confirmed user compromised | This detection indicates an admin has selected ‘Confirm user compromised’ in the Risky users UI or using risky Users API. | Offline |
| Malicious IP address | This detection indicates sign-in from a malicious IP address. | Offline |
| Suspicious inbox manipulation rules | This detection is discovered by Microsoft Cloud App Security (MCAS). This detection profiles your environment and triggers alerts when suspicious rules that delete or move messages or folders are set on a user’s inbox. | Offline |
| Impossible travel | This detection is discovered by Microsoft Cloud App Security (MCAS). This detection identifies two user activities (is a single or multiple sessions) originating from geographically distant locations within a time period shorter than the time it would have taken the user to travel from the first location to the second, indicating that a different user is using the same credentials. | Offline |
As we can see above, there are two detection types. Realtime detection will take 5-10 minutes to show the results. Offline detection can take up to 24 hours to show the results.
Let’s go ahead and see how we can create a conditional access policy.
Configure conditional access policy
1. Log in to Azure Portal (https://portal.azure.com/) as Global / Security / Conditional Access Administrator
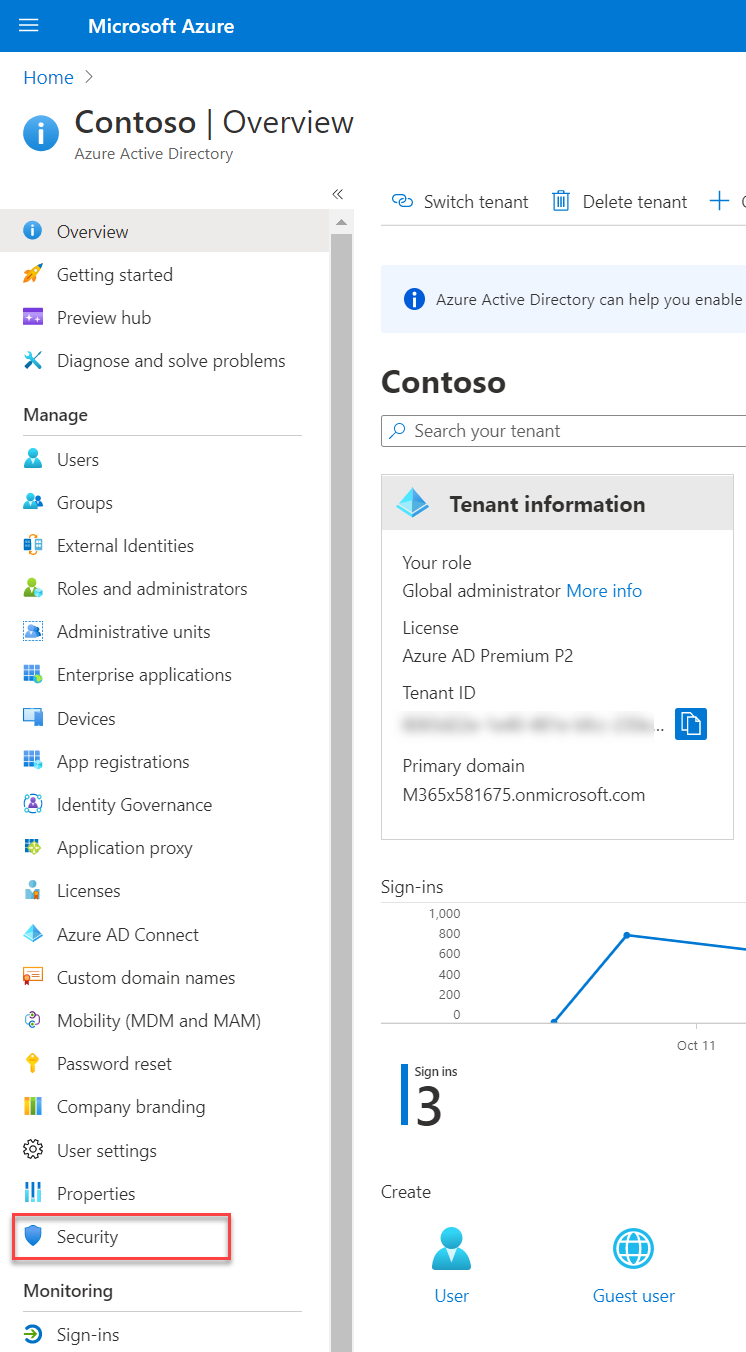
2. Then go to Azure Active Directory
3. On the Azure Active Directory page click on Security
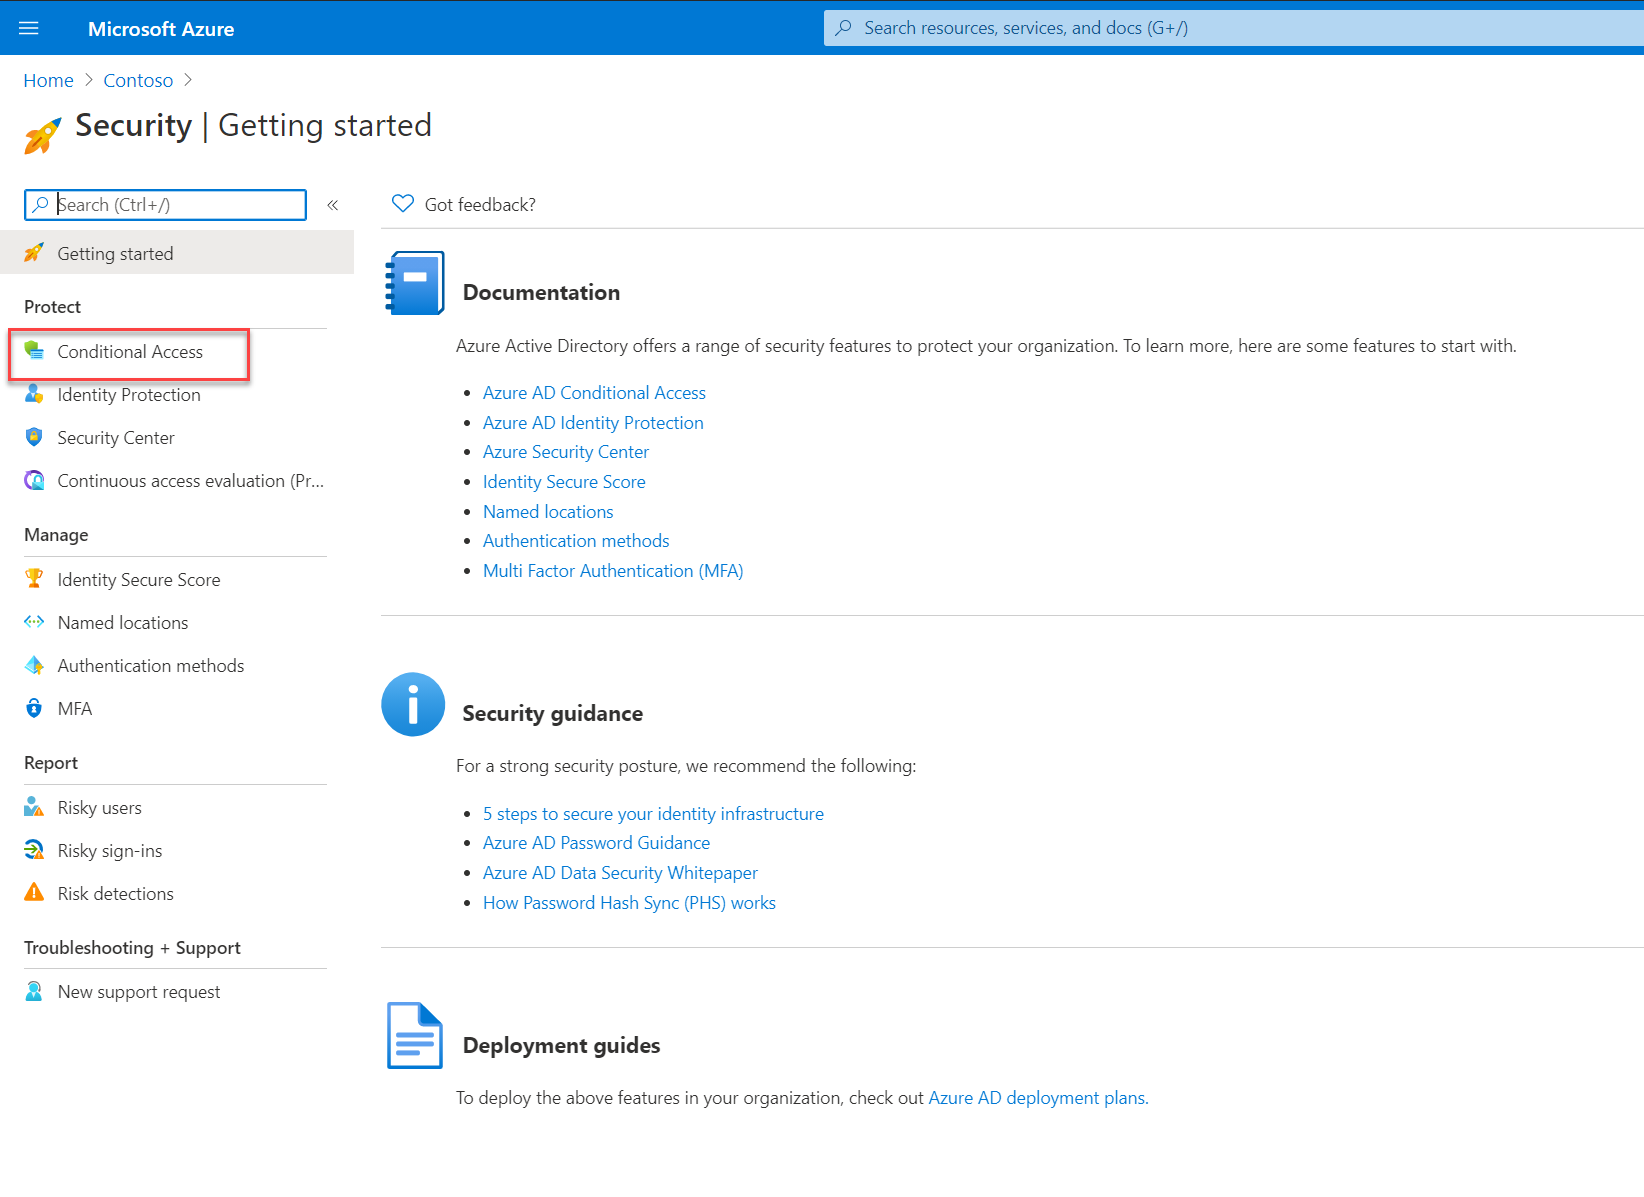
4. On the Security Home page, click on Conditional Access
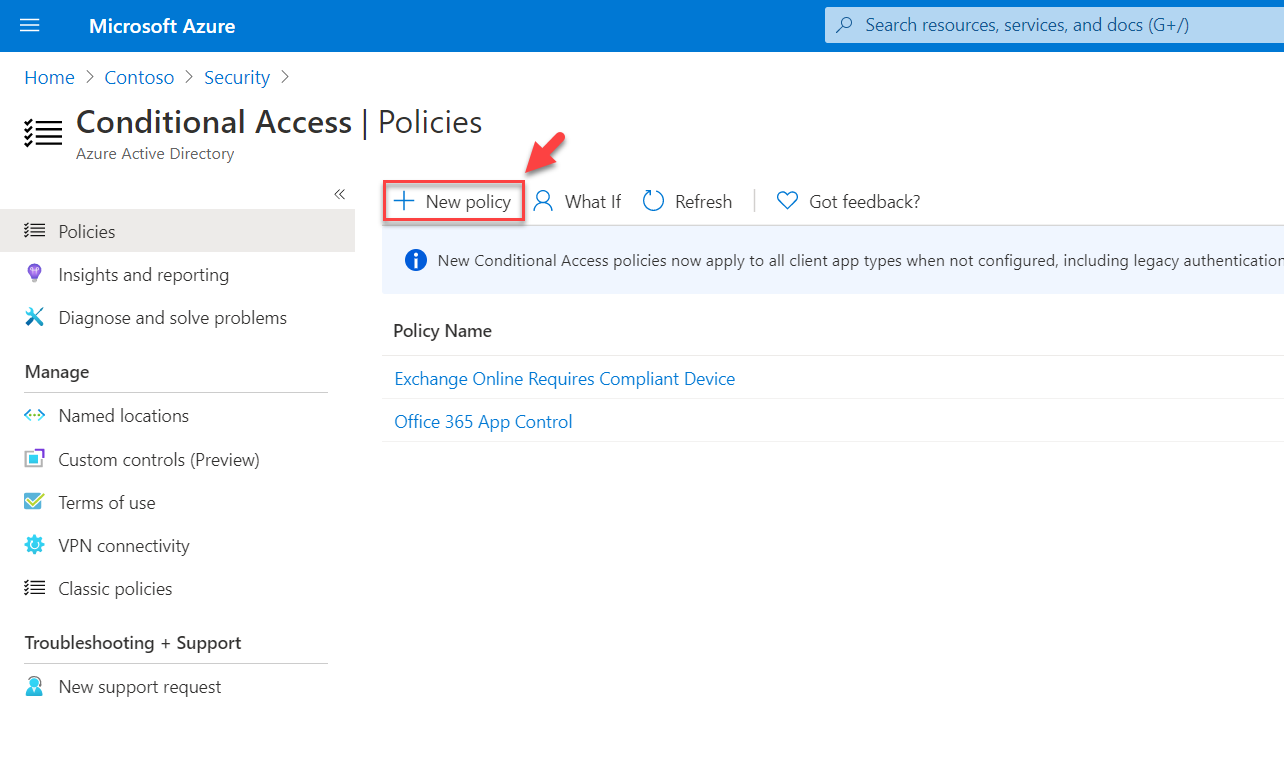
5. Then click on + New Policy
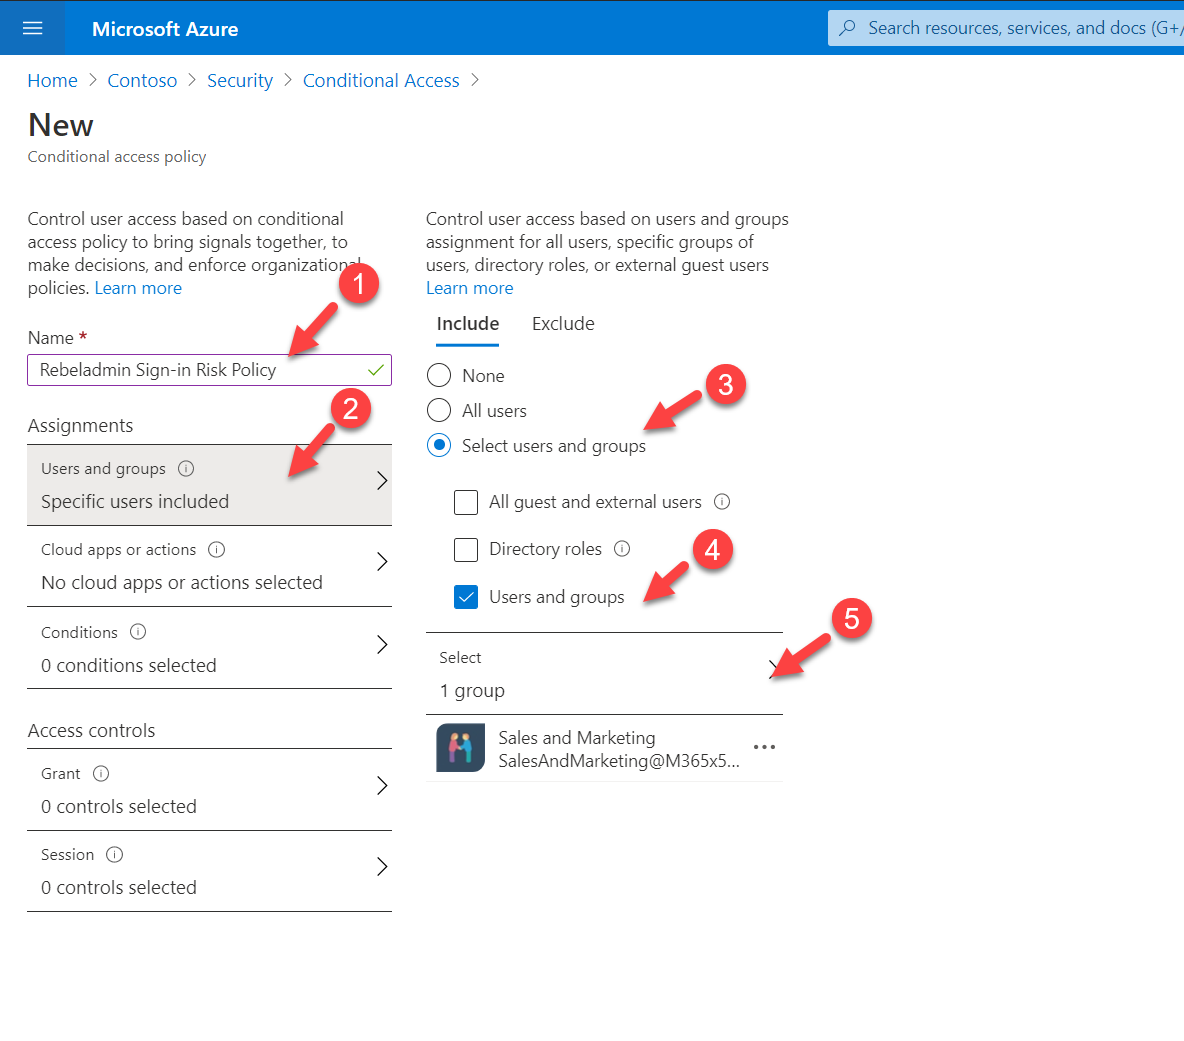
6. This will open up a new policy window. Provide a name for the policy and then click on Users and Groups. Here I am going to apply the policy to Sales & Marketing team. To do that click on the Users and groups option and then select Sales & Marketing team
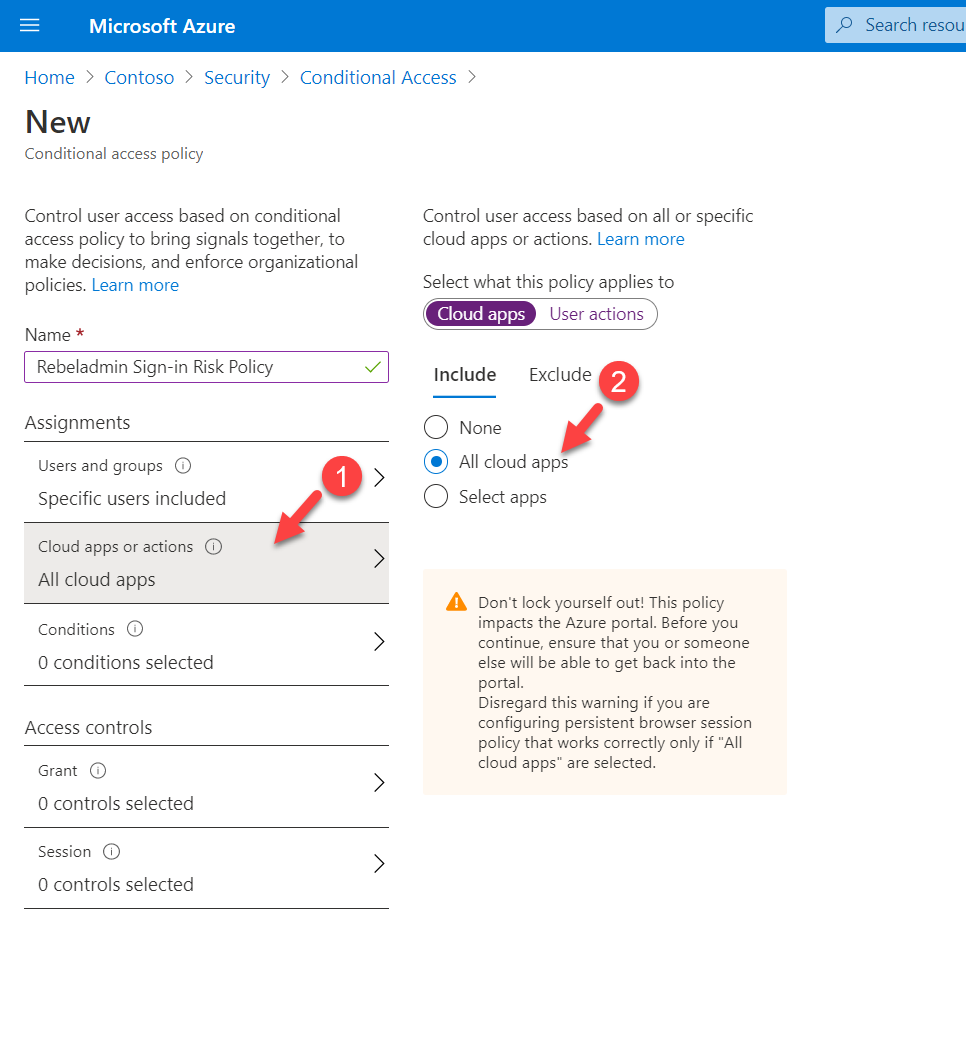
7. As the next step, click on cloud apps or actions. I am going to apply this policy to all cloud apps access. To do that, select All cloud apps from the list.
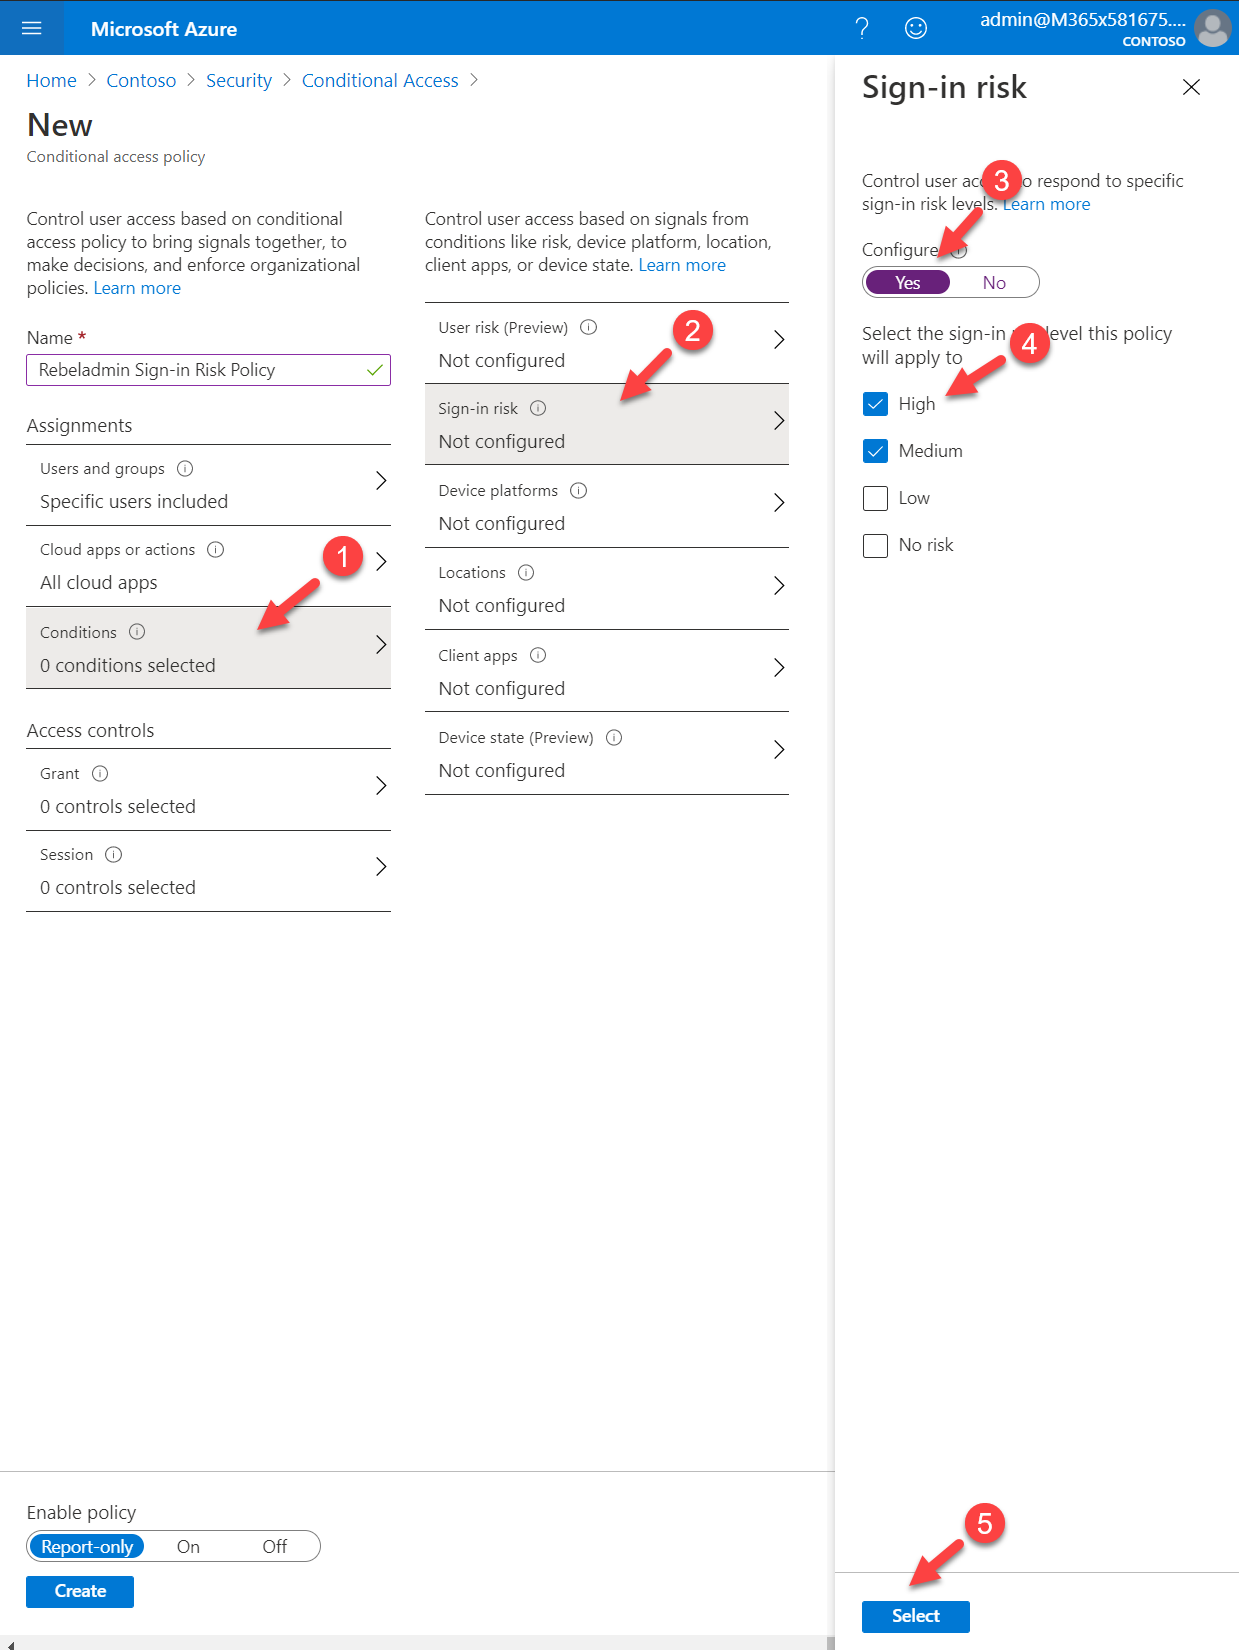
8. Next, click on Conditions | Sign-in risk. To proceed with the configuration, set Yes under the Configure option. In this policy, I am going to target High and Medium level risks. For that, from the list choose relevant options and click on Select to complete the configuration.
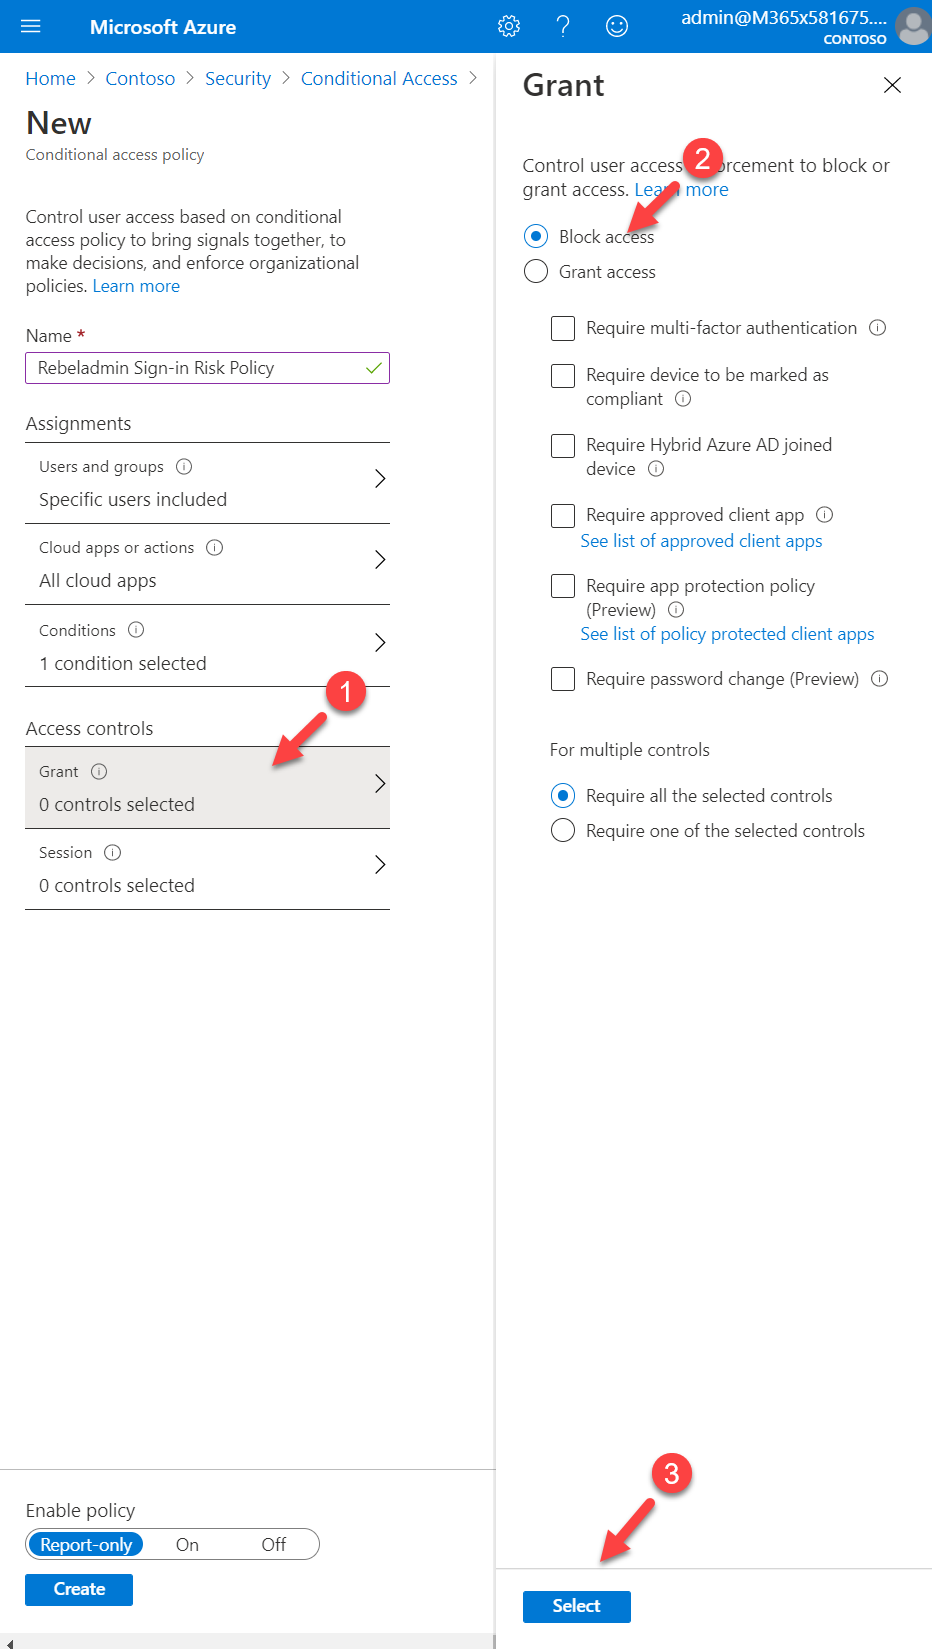
9. Then under the Access control section, click on Grant. I like to block all the High and Medium risk sign in attempts. To do that I click on the Block Access option.
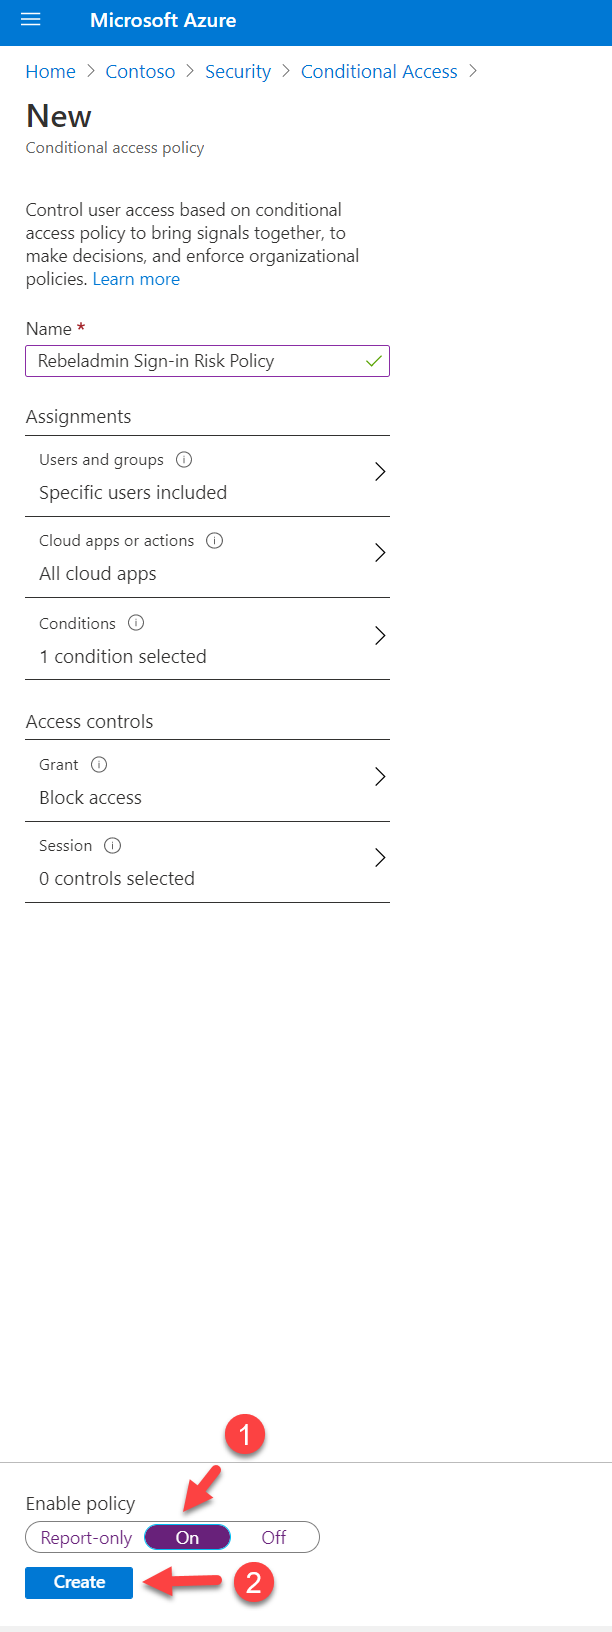
10. To complete the policy configuration, set Enable Policy to On and click Create
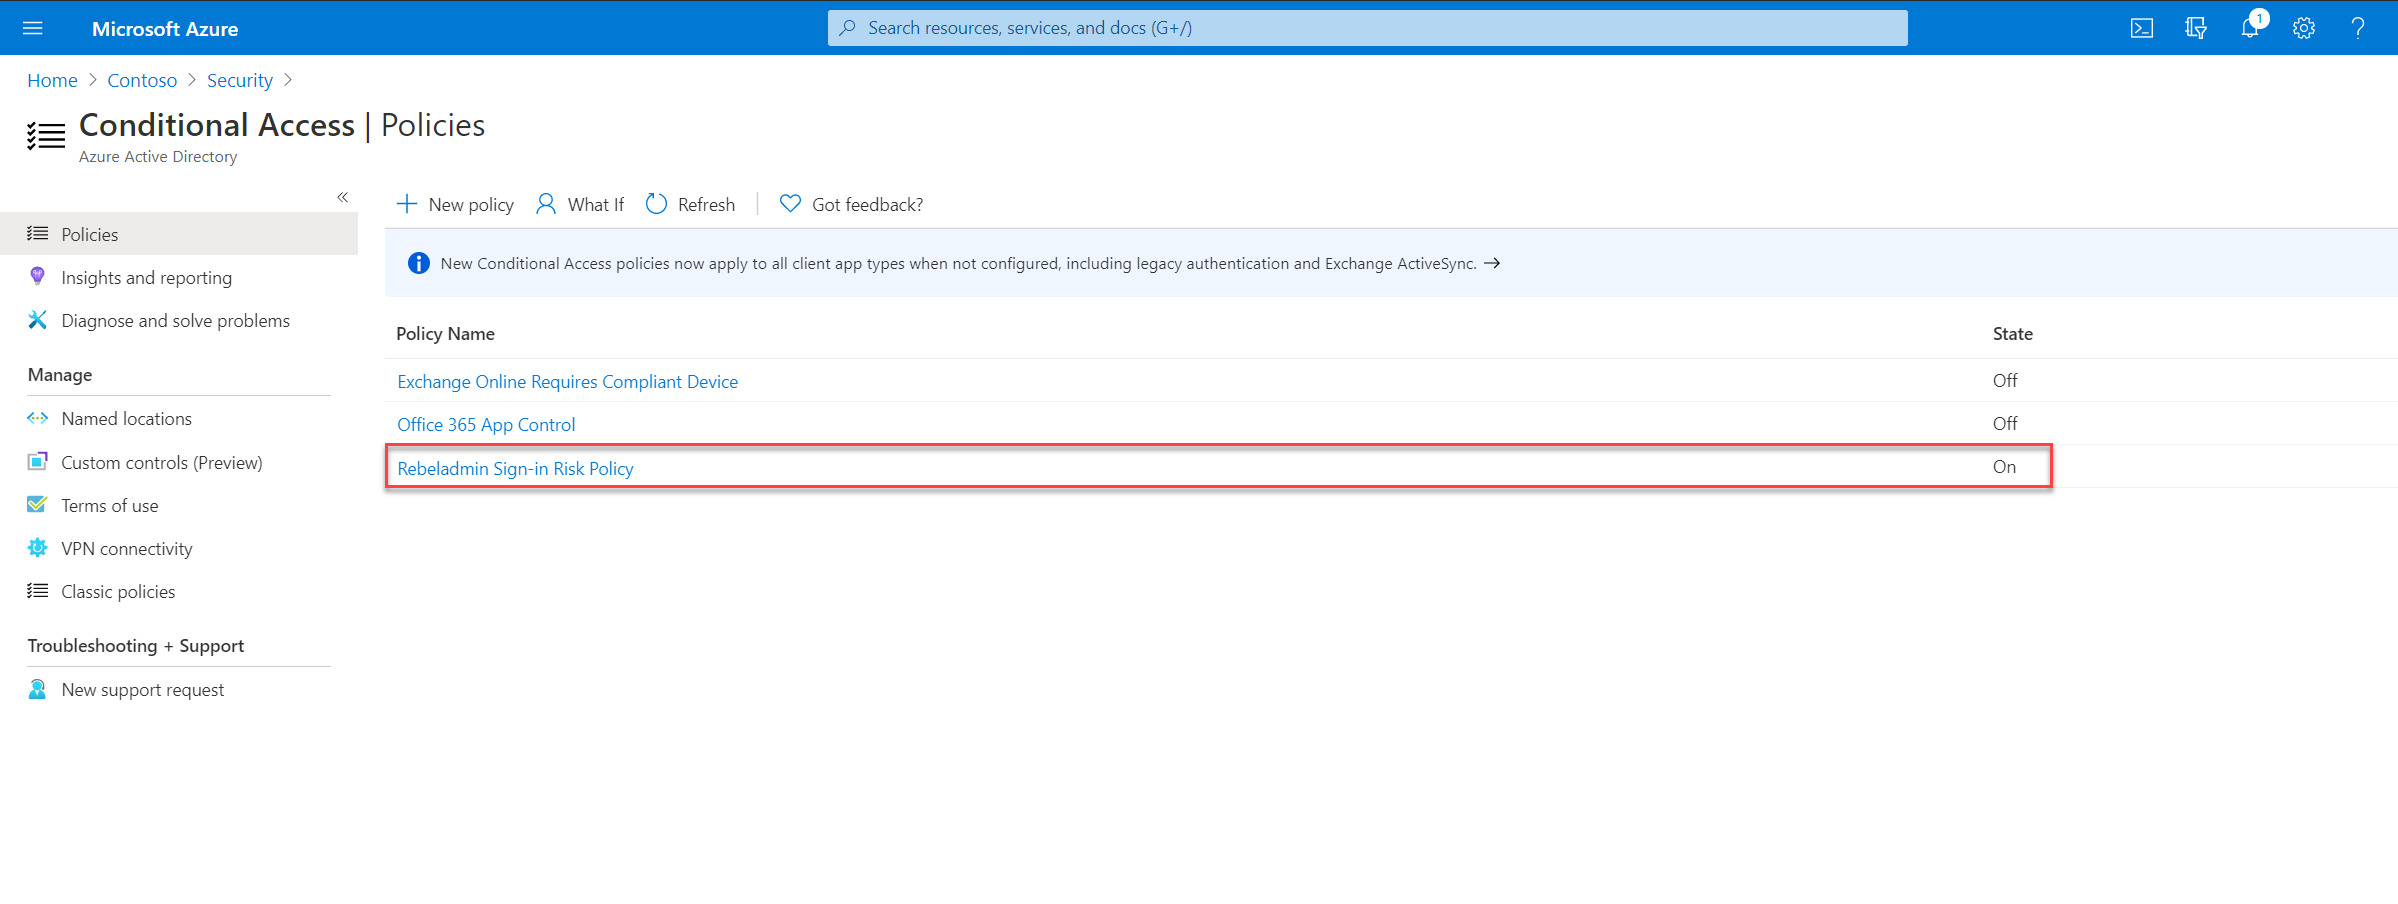
As we can see above, the new policy is up and running. Hope now you have a better understanding of how to configure sign-in risk-based azure conditional access policies. If you have any questions feel free to contact me at rebeladm@live.com also follow me on twitter @rebeladm to get updates about new blog posts.




Awesome content 👍